> For the complete documentation index, see [llms.txt](https://docs.flosum.com/llms.txt). Markdown versions of documentation pages are available by appending `.md` to page URLs; this page is available as [Markdown](https://docs.flosum.com/devops/devops-ja/mcpsb/claudewodevops-mcpsbnisuru.md).
# ClaudeをDevOps MCPサーバーに接続する
{% hint style="warning" %}
#### ベータ
DevOps MCP サーバーはベータ版です。一部のツールはまだ期待どおりに動作しない場合があり、このドキュメントにはサーバーへの最新の変更が反映されていない可能性があります。
{% endhint %}
##  概要
この記事では、ClaudeをカスタムコネクタとしてDevOps MCP(Model Context Protocol)サーバーに接続する方法を説明します。接続すると、ClaudeはDevOps MCPツールを使ってDevOpsデータを操作できます。セットアップ時には自分のFlosumユーザーでサインインするため、ClaudeはConnected Appを作成したユーザーではなく、そのユーザーとしてDevOpsに接続します。
{% hint style="info" %}
#### 開始前に
次の権限を持つFlosumユーザーが必要です。 **読み取りアクセス** 対象: **DevOps**.
MCPアクセス用のConnected Appは、SystemAdministratorが作成する必要があります。詳しくは、以下の記事を参照してください。
* [MCPアクセス用のConnected Appを作成する](https://docs.flosum.com/global-settings/global-settings-docs-ja/sekyuriti/miapuri/mcpakusesunoconnected-appwosuru.md)
Connected Appには、ClaudeのコールバックURLも必要です。まだ追加されていない場合は、SystemAdministratorが以下の手順の **コールバックURLを追加する** で追加します。
{% endhint %}
## ClaudeをDevOpsに接続する
{% stepper %}
{% step %}
## Global Settingsにログインする
Global Settingsにログインします。ログイン方法については、以下の記事を参照してください。
* [グローバル設定にログインする](https://docs.flosum.com/global-settings/global-settings-docs-ja/hajimeni/gurbaruniroguinsuru.md)
{% endstep %}
{% step %}
## コールバックURLを確認する
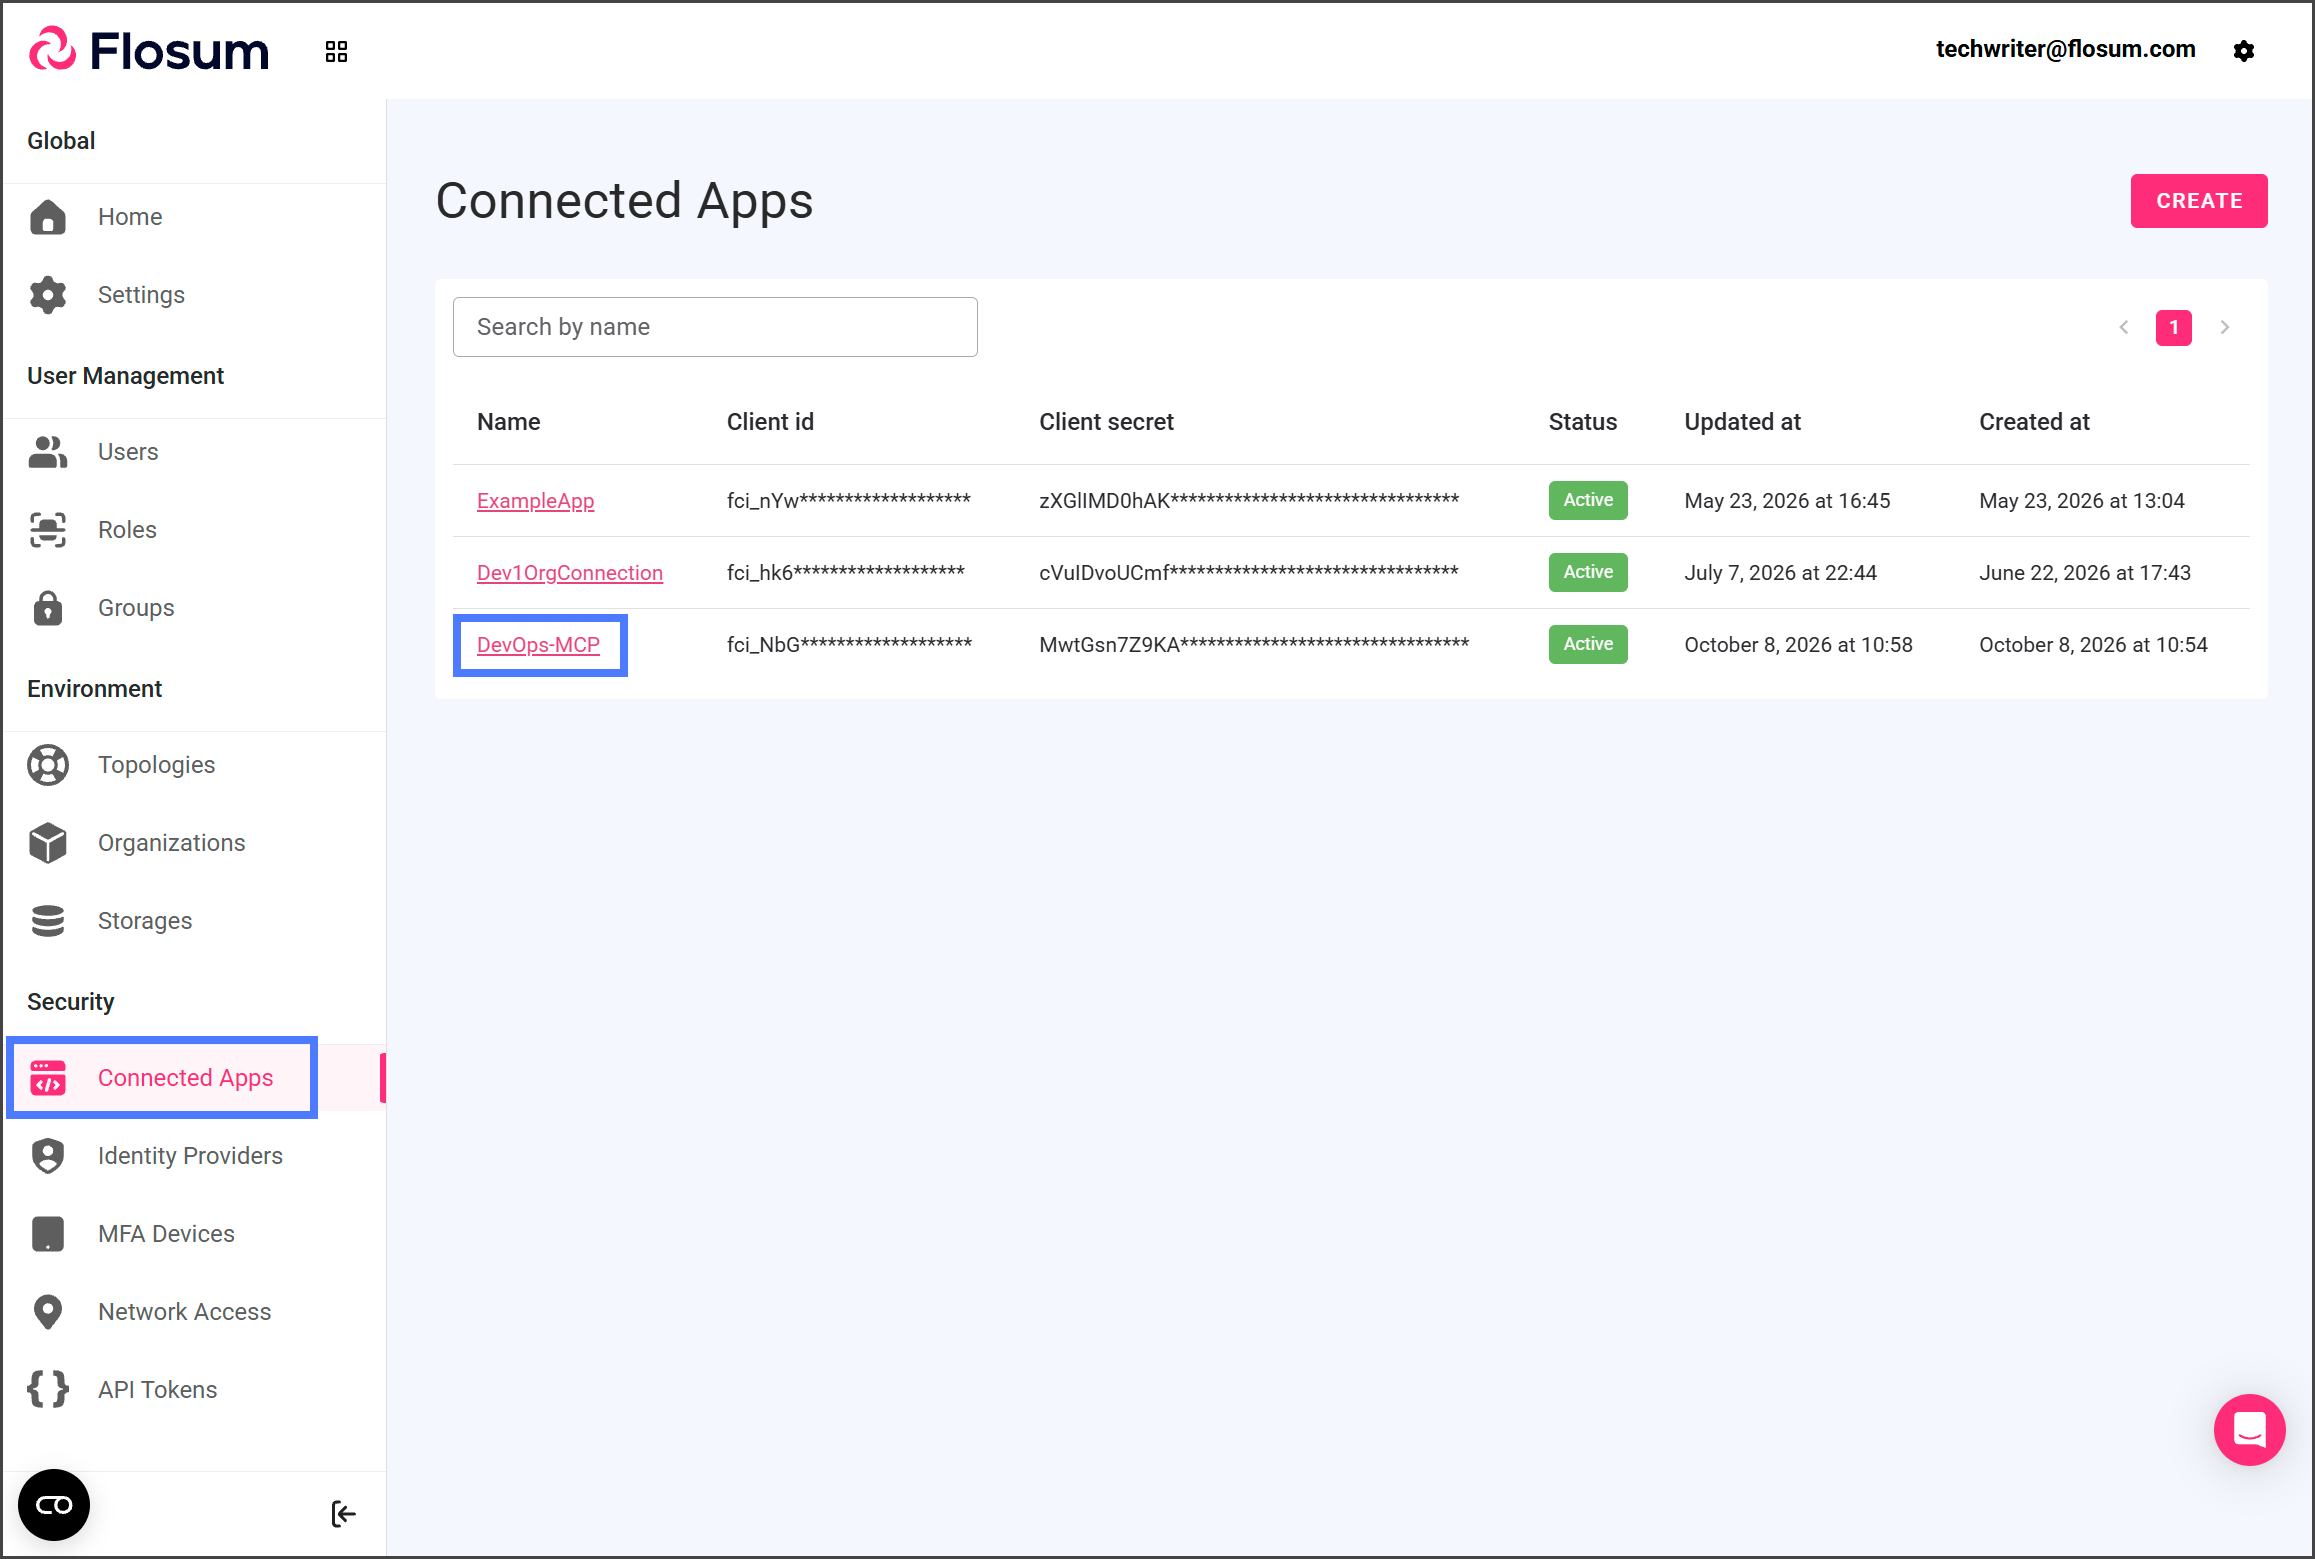
1. クリックします: **Connected Apps** 左側のサイドバーメニューから選択します。
2. MCPアクセス用に作成したConnected Appをクリックします。
3. 「 **Authorized URLs**」の下で、 **Callback URLs** に次の両方が表示されていることを確認します。
1. `https://claude.ai/api/mcp/auth_callback`
2. `https://claude.com/api/mcp/auth_callback`
{% hint style="info" %}
#### Callback URLs
両方のURLが表示されている場合は、 **Client IDとClient Secretをコピーする** の手順に進みます。表示されていない場合は、SystemAdministratorが次の手順を完了して追加する必要があります。
{% endhint %}
{% endstep %}
{% step %}
## コールバックURLを追加する
1. クリックします: **Edit**.
2. クリックします: **ADD URL** 「 **Allowed callback URLs**.
3. に、次を入力します: `https://claude.ai/api/mcp/auth_callback`.
4. クリックします: **ADD URL**.
5. 次を入力します: `https://claude.com/api/mcp/auth_callback`.
6. クリックします: **Save**.
{% hint style="info" %}
現在、Claudeは `claude.ai` のコールバックURLを使用しています。コールバックURLが変更されても接続を維持できるよう、Anthropicは `claude.com` のURLも追加することを推奨しています。
{% endhint %}
{% endstep %}
{% step %}
## クライアント ID とクライアントシークレットをコピーする
任意のユーザーが **クライアント ID** と **クライアントシークレット** を接続済みアプリからコピーできます。
1. クリックして **クライアント ID** フィールドの値をコピーします。
2. コピーした値を保存します。
3. クリックして **クライアントシークレット** フィールドの値をコピーします。
4. コピーした値を保存します。
{% endstep %}
{% step %}
## Claude にカスタムコネクタを追加する
{% hint style="info" %}
以下の手順は Claude で行います。Claude のバージョンによって、画面や設定が異なる場合があります。Claude でカスタムコネクタを追加する手順の詳細については、次の記事をご覧ください。
* [リモート MCP を使ったカスタムコネクタの利用を開始する](https://support.claude.com/en/articles/11175166-get-started-with-custom-connectors-using-remote-mcp)
{% endhint %}
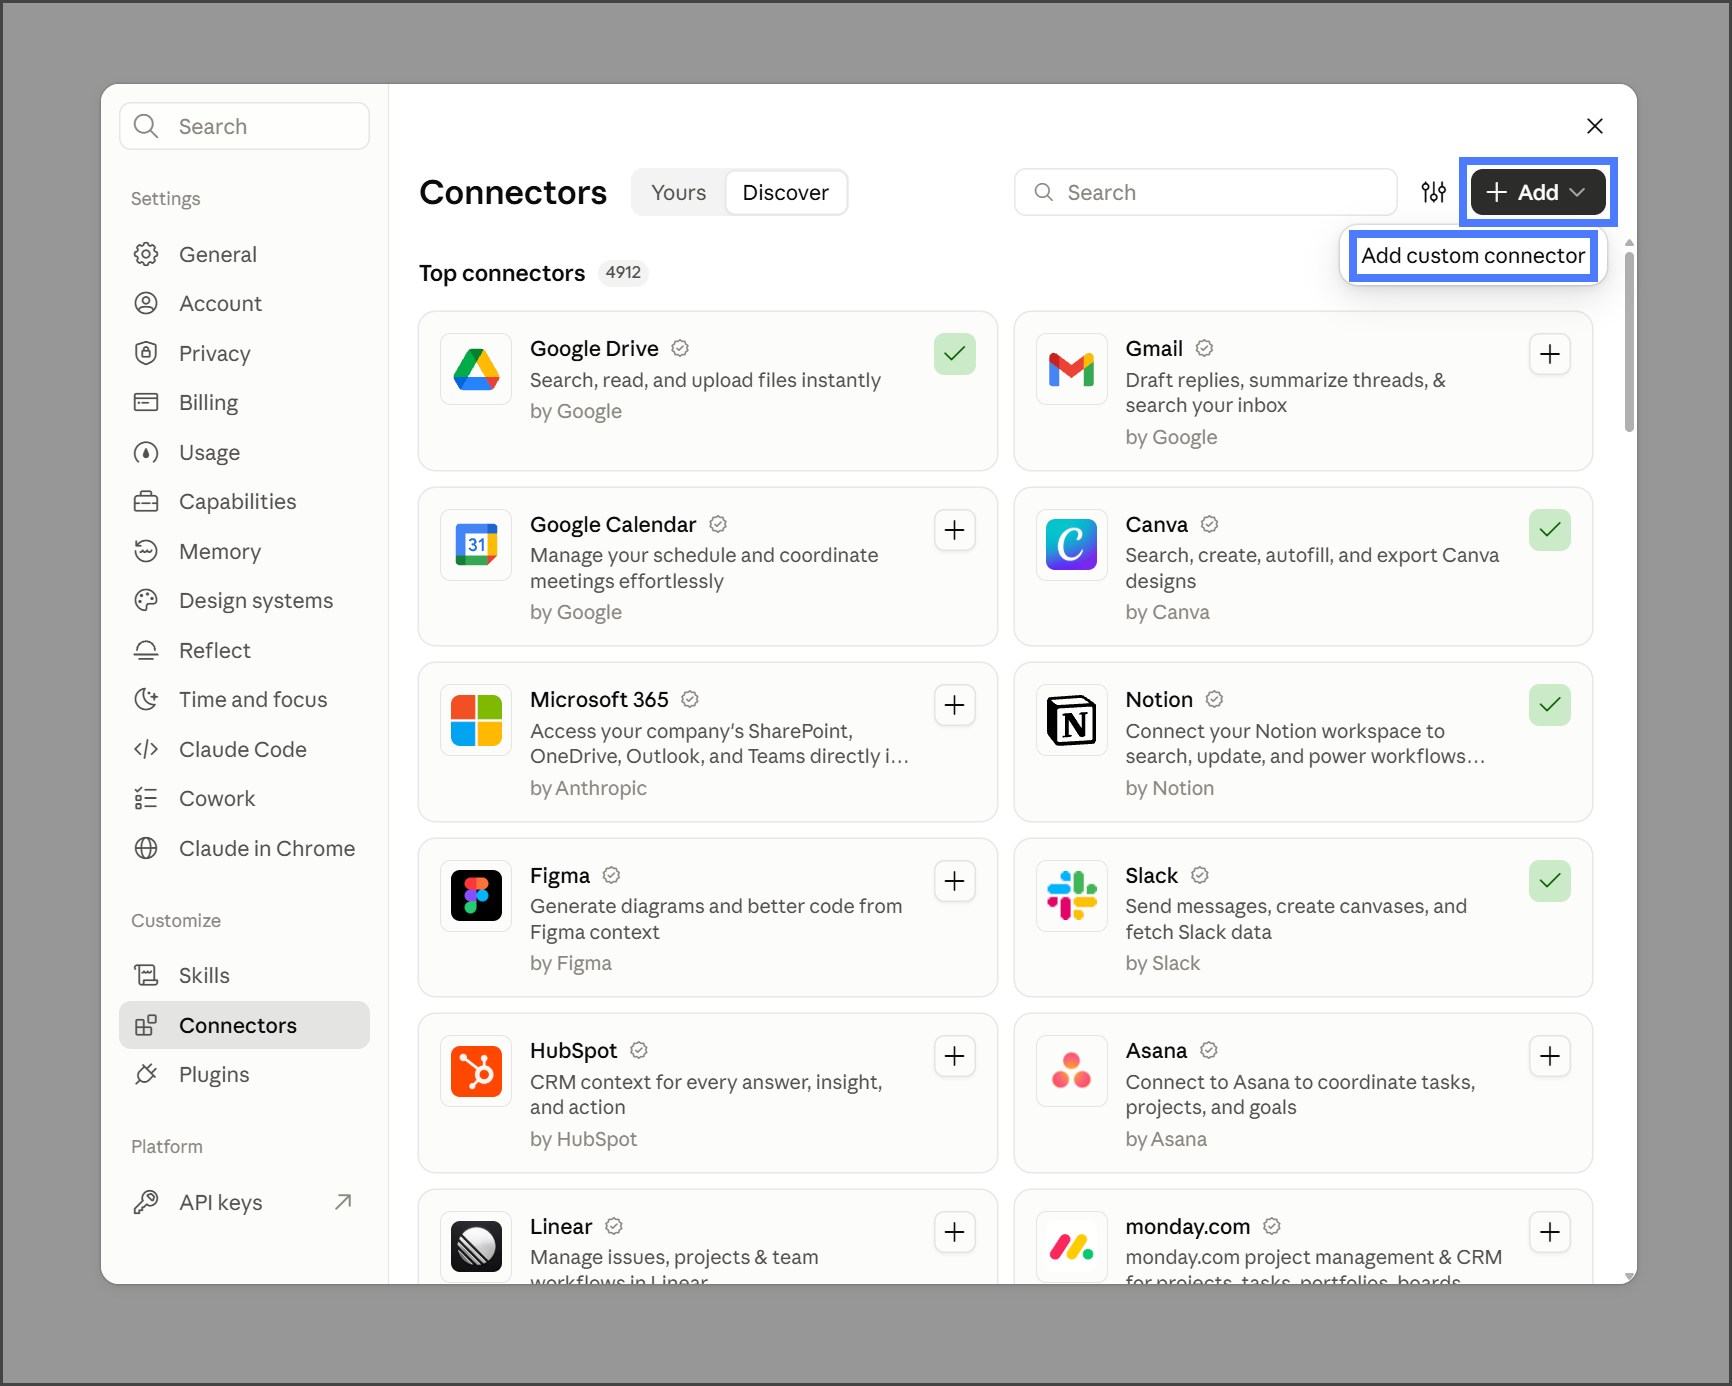
1. Claude で **設定**.
2. をクリックします **コネクタ**.
3. をクリックします **追加**.
4. をクリックします **カスタムコネクタを追加**.
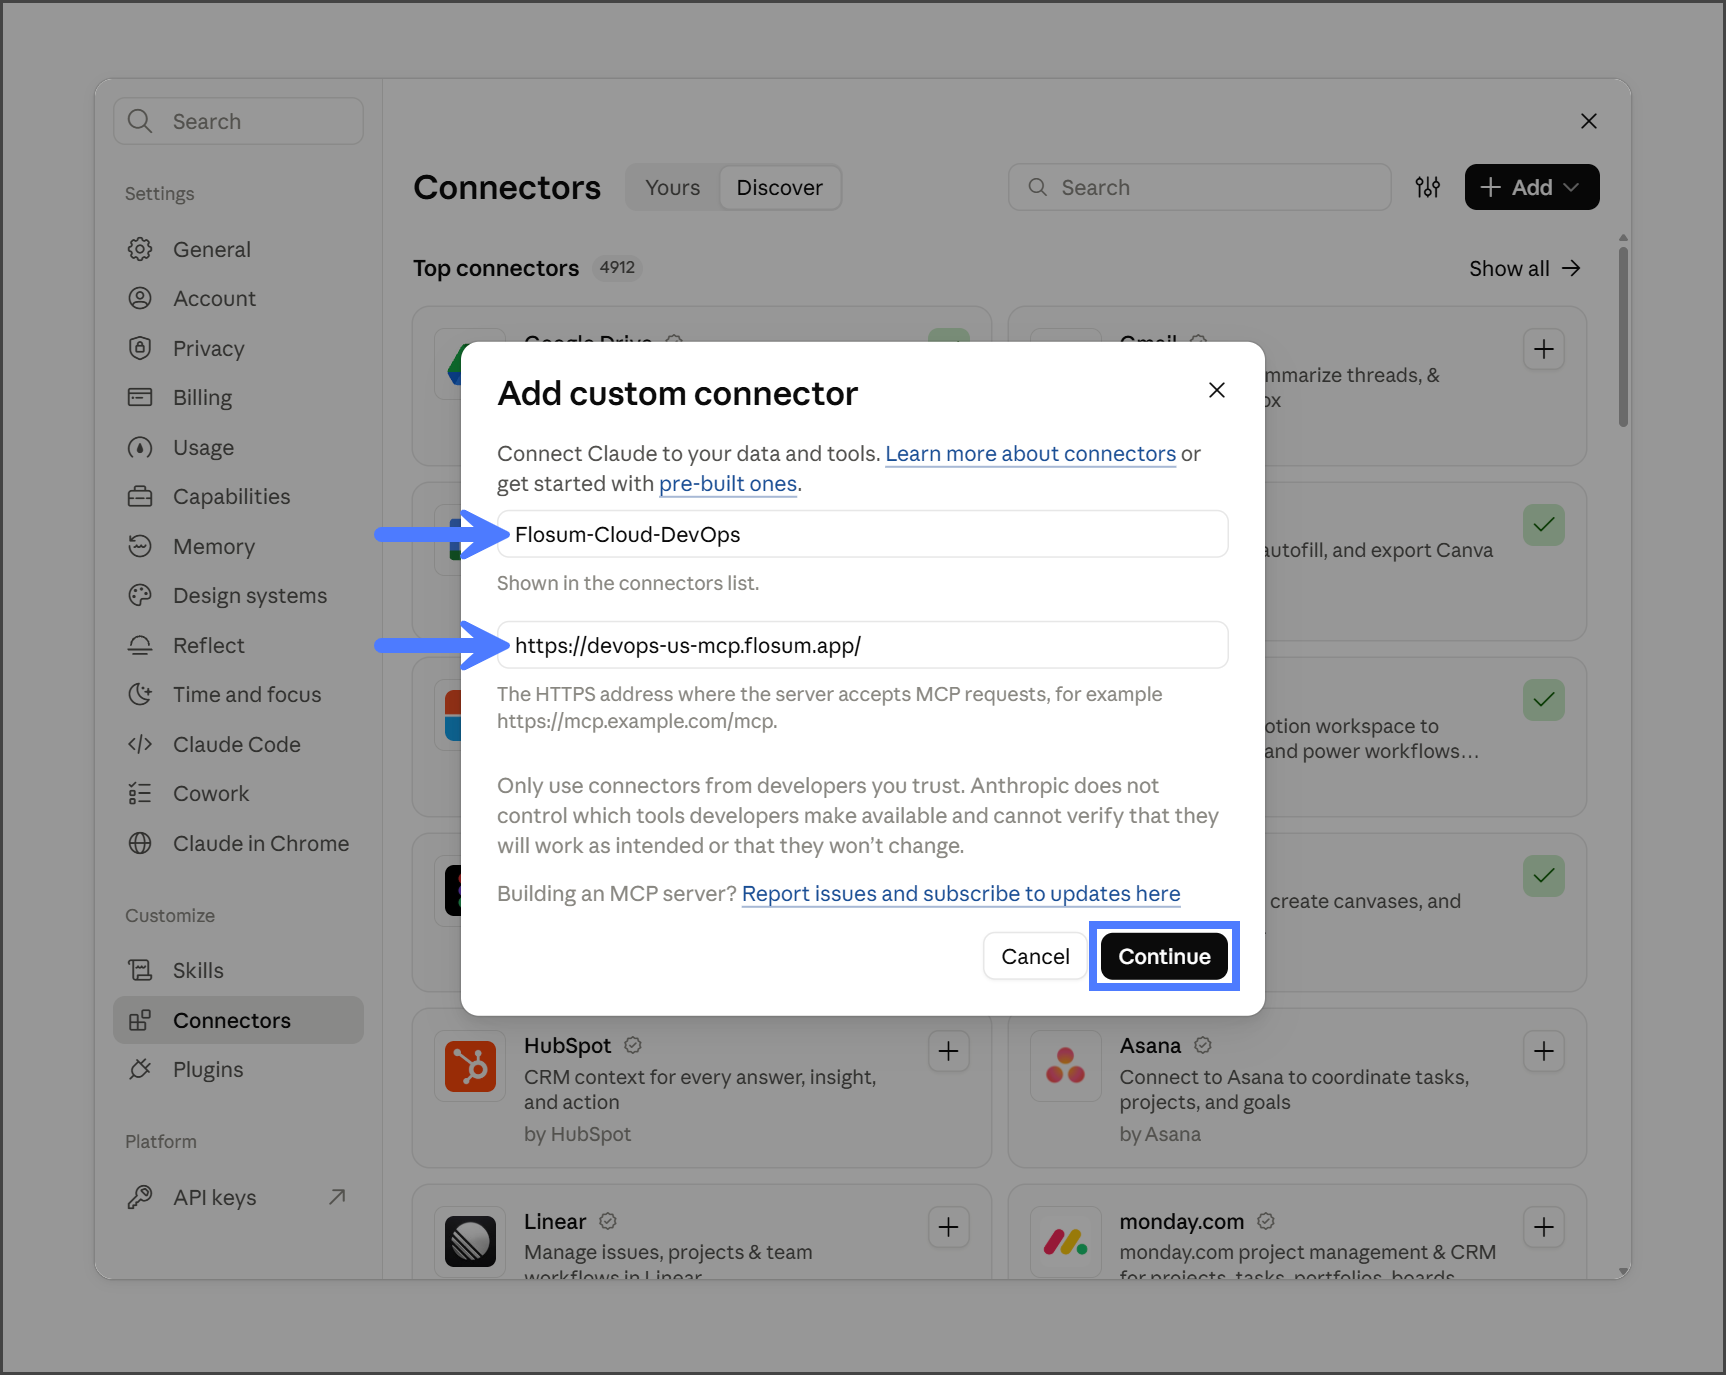
5. コネクタ名を入力します。この名前はコネクタの一覧に表示されます。
6. Flosum Cloud Apps テナントのリージョンに対応する MCP サーバー URL を入力します。
| リージョン | DevOps MCP サーバー |
|---|
| 米国 | space.vars.mcp_url_us |
| ドイツ | space.vars.mcp_url_de |
| 日本 | space.vars.mcp_url_jp |
| オーストラリア | space.vars.mcp_url_au |
7. クリックして **続行**.
{% endstep %}
{% step %}
## 認証を設定する
{% hint style="info" %}
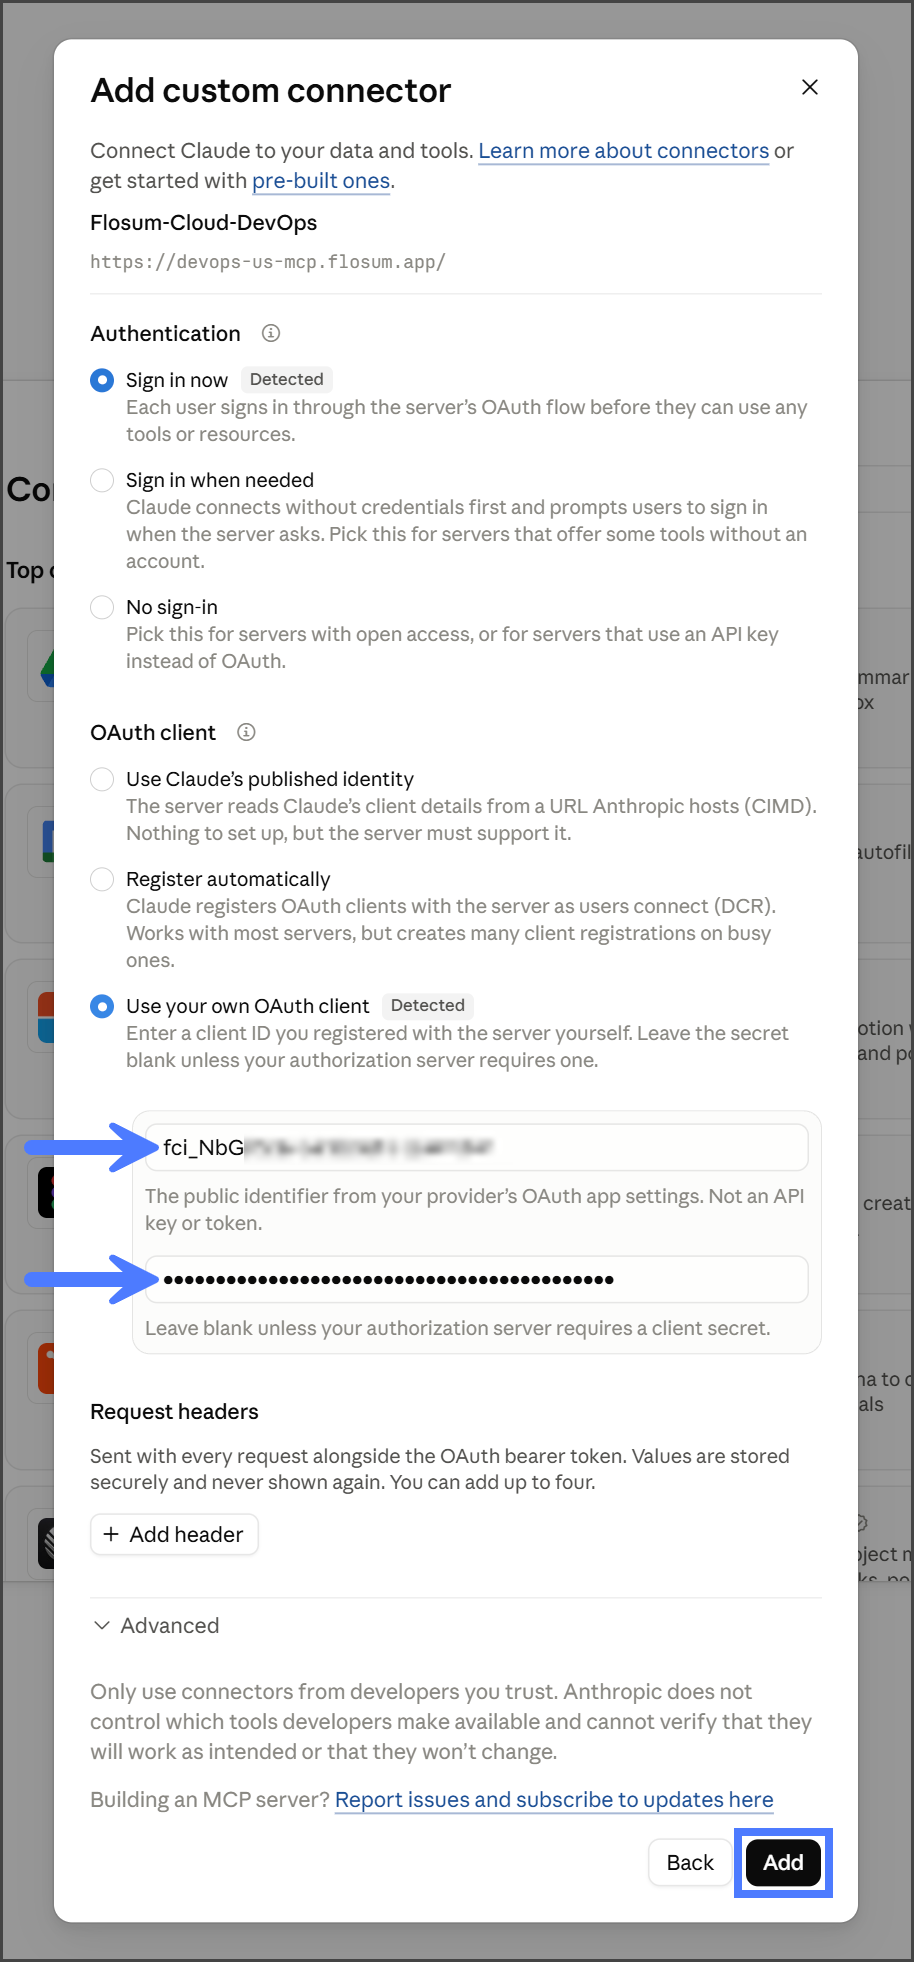
「 **カスタムコネクタを追加** 」フォームでは、 **認証** と **OAuth クライアント** の設定が自動的に検出され、 **検出済み**.
{% endhint %}
1. 次のことを確認します。 **認証** が次のように設定されていることを確認します: **今すぐサインイン**.
2. 次のことを確認します。 **OAuth クライアント** が次のように設定されていることを確認します: **独自の OAuth クライアントを使用する**.
3. 入力します **クライアント ID** Connected App からコピーした値です。
4. 入力します **クライアントシークレット** Connected App からコピーした値です。
5. をクリックします **追加**.
{% endstep %}
{% step %}
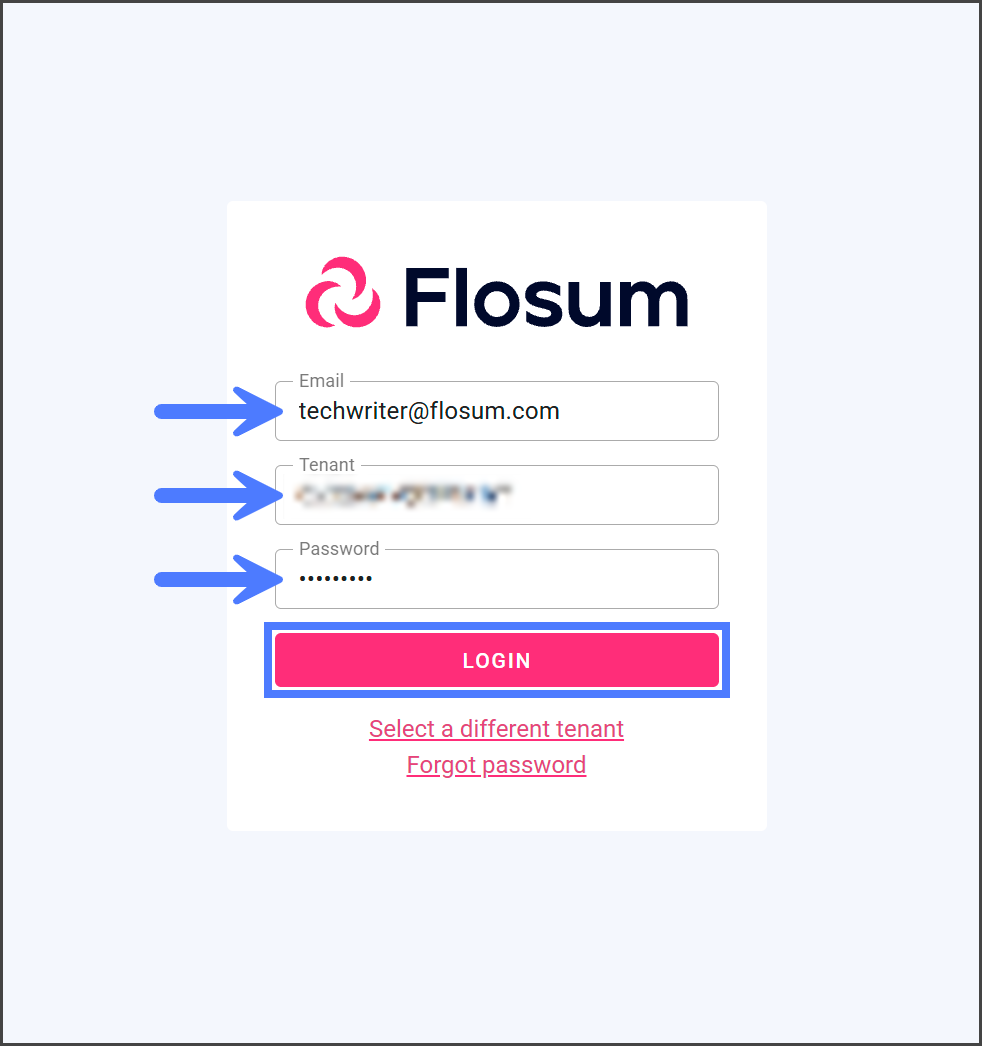
## Flosum にサインイン
{% hint style="warning" %}
同じブラウザーで Flosum Cloud Apps にログインしている場合、Claude はその Flosum ユーザーで接続するため、サインインページは表示されません。別のユーザーで接続するには、 **接続**をクリックする前に Flosum Cloud Apps からログアウトしてください。Claude がすでに誤ったユーザーで接続している場合は、コネクターの **切断** をクリックし、Flosum Cloud Apps からログアウトしてから、もう一度接続してください。
{% endhint %}
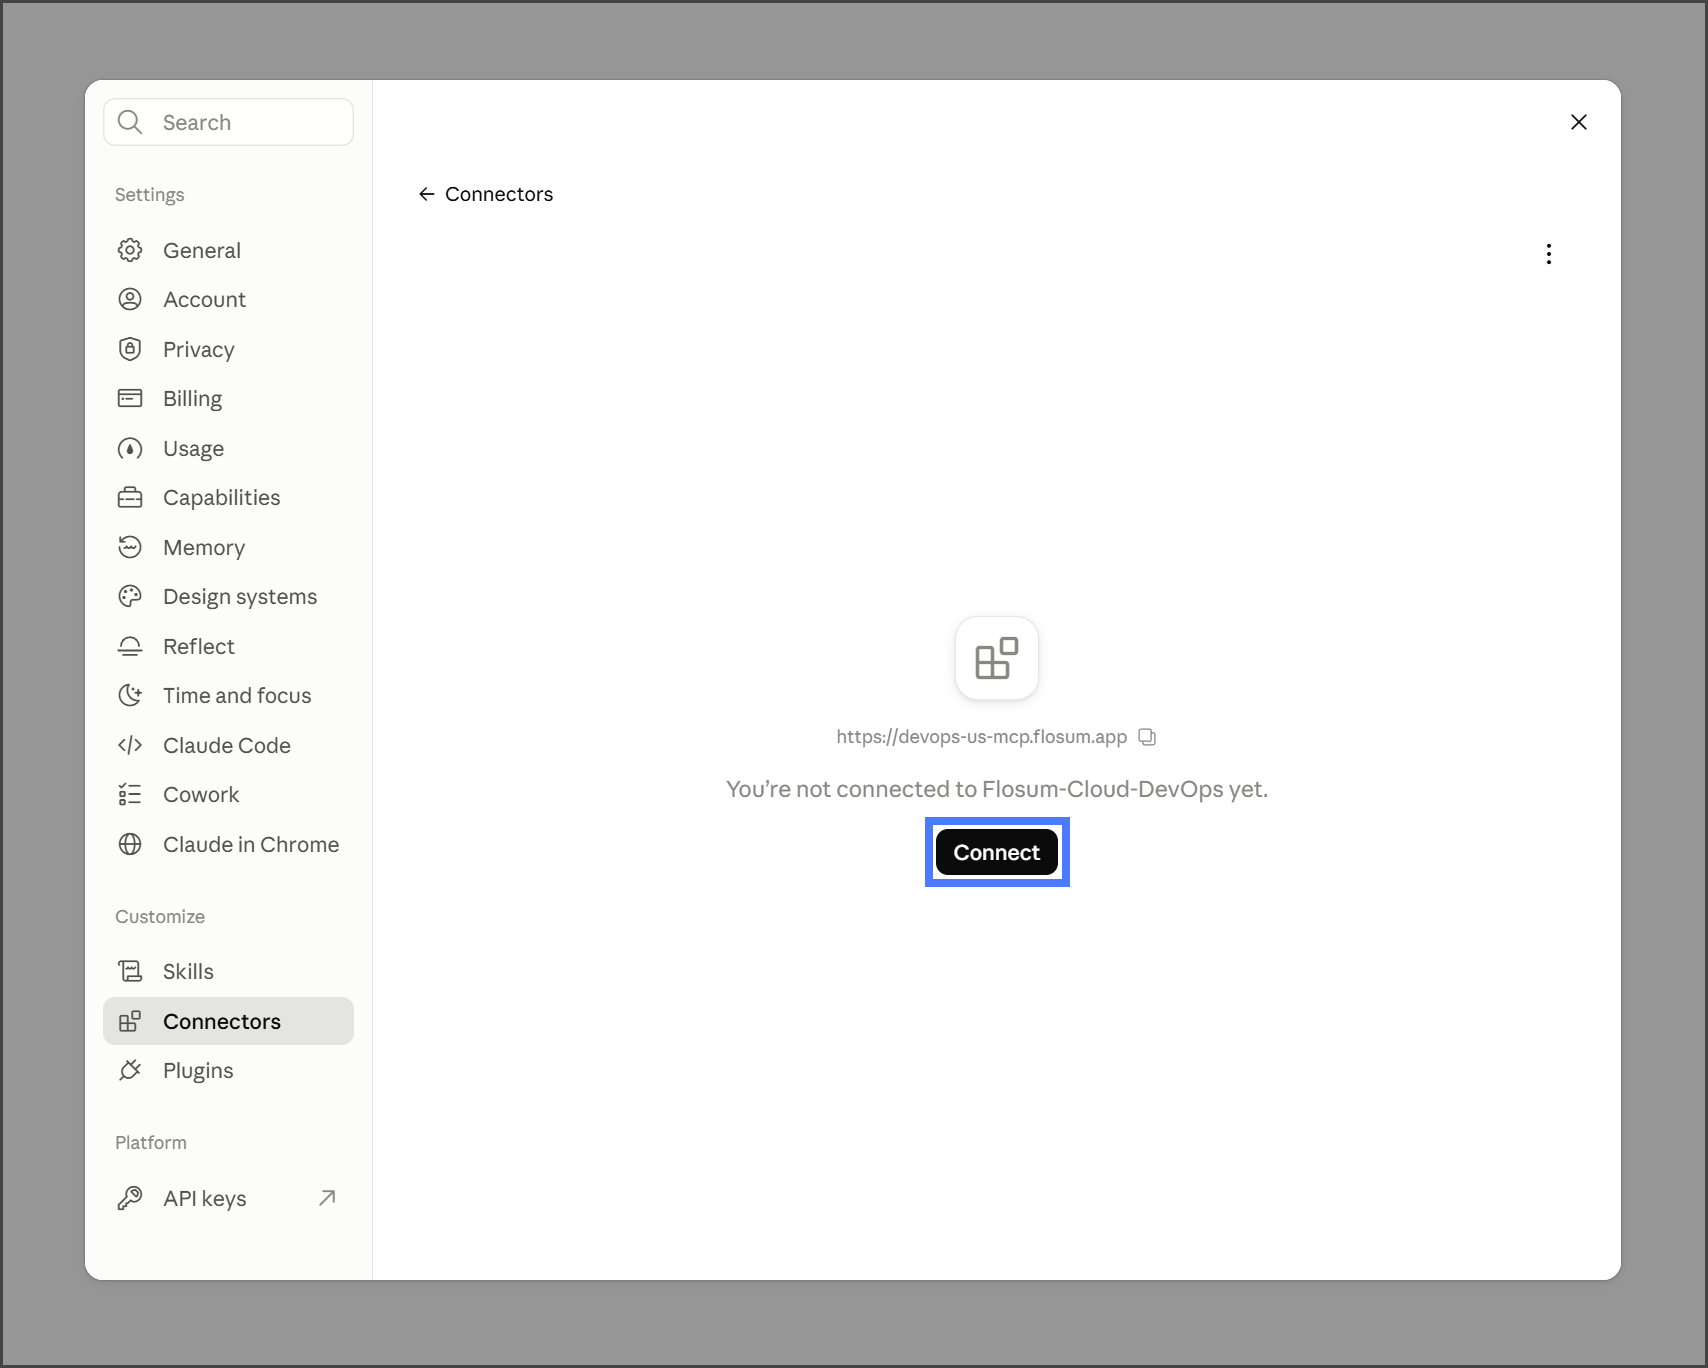
1. クリックします **接続**.
2. Flosum の **メールアドレス**.
3. 入力します **テナント**.
4. 入力します **パスワード**.
5. クリックします **ログイン**.
{% endstep %}
{% step %}
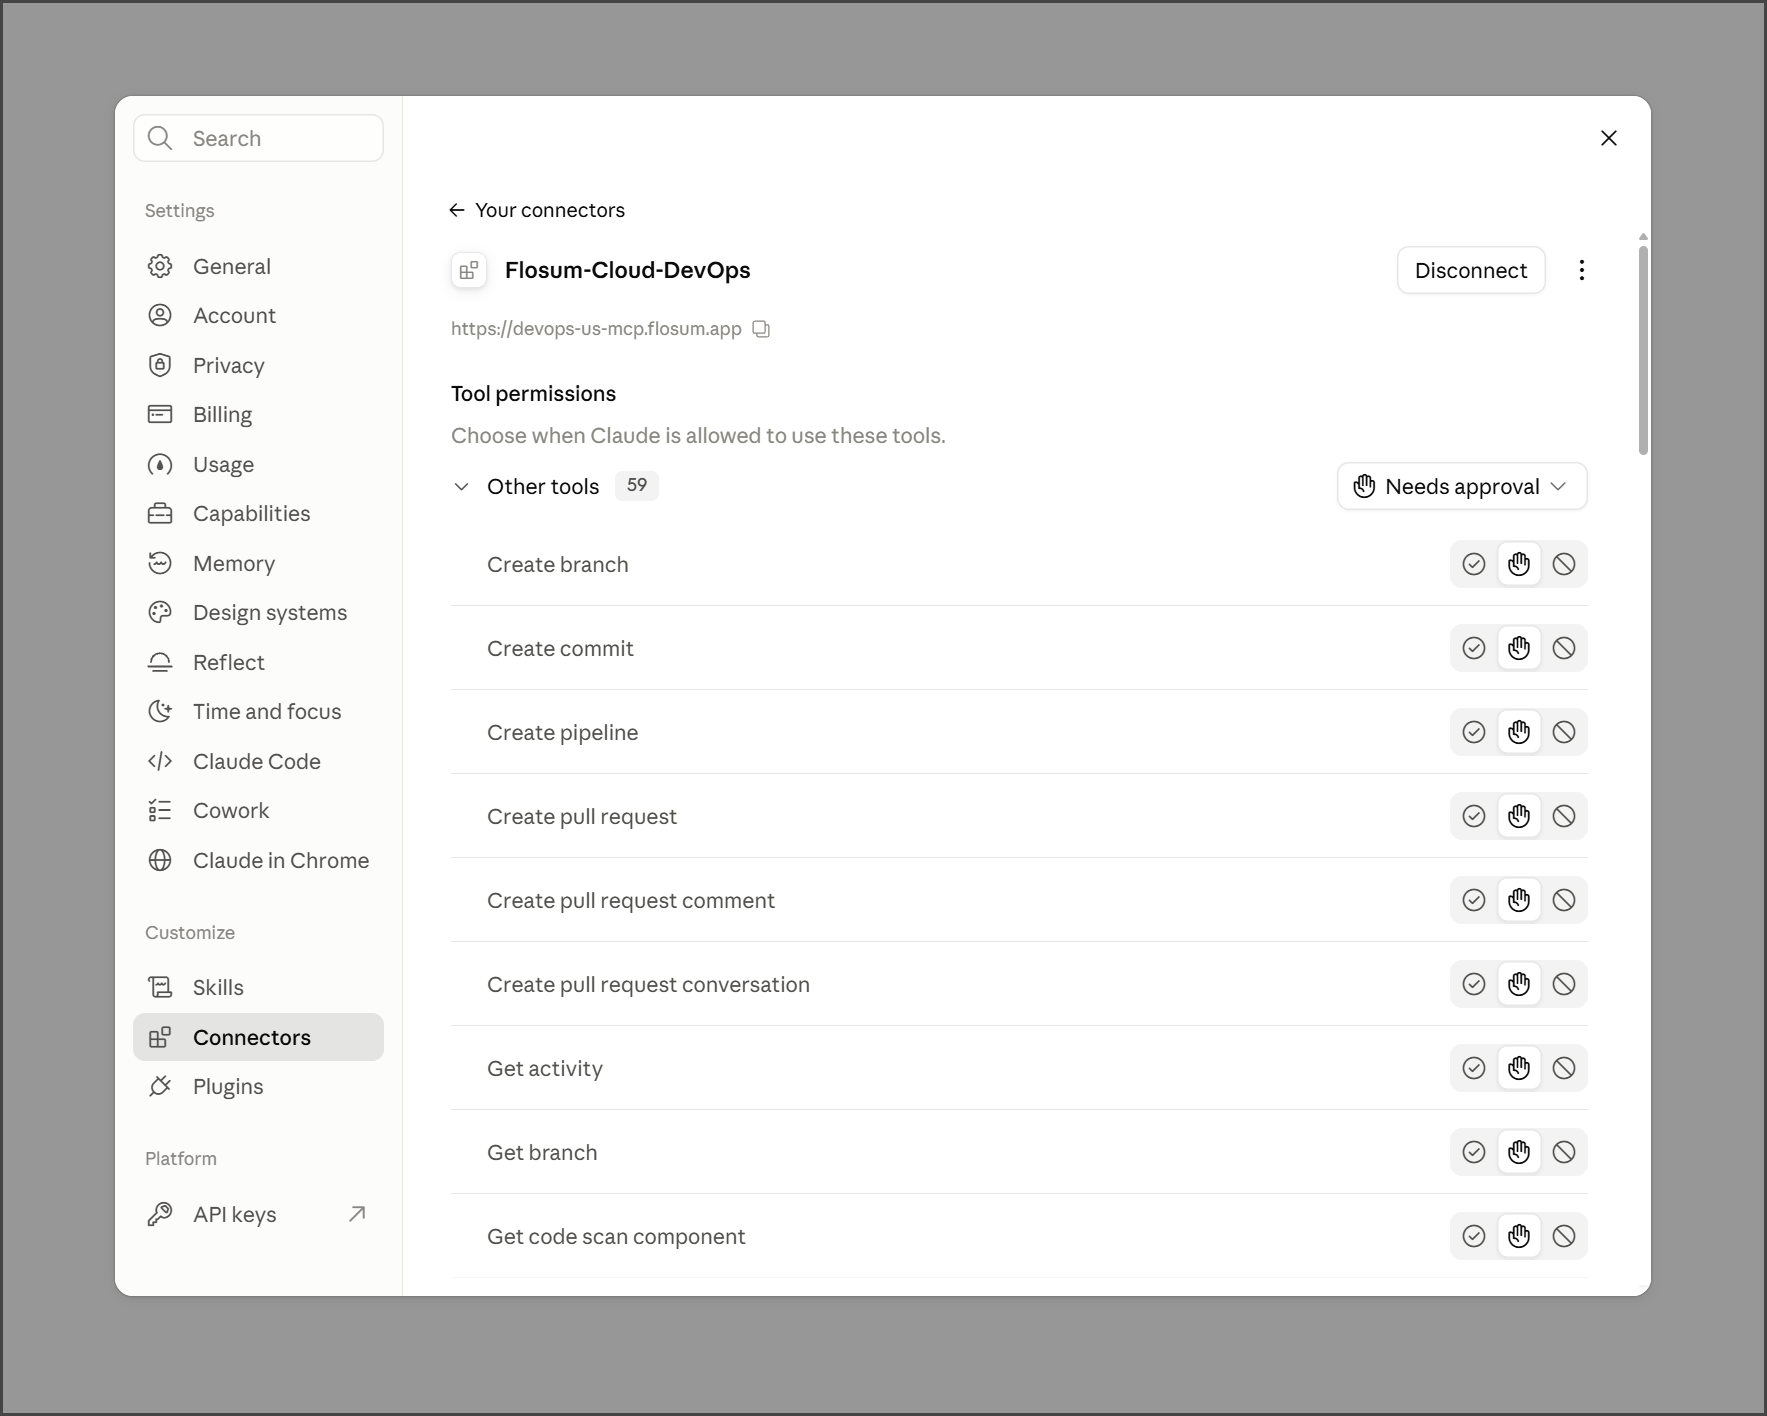
## ツールの権限を確認する
サインインすると、コネクターのページに DevOps MCP ツールが **ツールの権限**の下に一覧表示されます。組織のアクセス ポリシーに従って、Claude に各ツールの使用を許可するタイミングを選択してください。ドロップダウンメニューを使うとすべてのツールを一括で設定でき、各ツールの横にあるアイコンを使うと個別に設定できます。
{% hint style="success" %}
DevOps MCP サーバーに接続されました。Claude で新しい会話を開始すると、DevOps MCP ツールを使用できます。
{% endhint %}
{% hint style="info" %}
接続は、サインインした時点から Connected App の **リフレッシュトークンの有効期間**が経過するまで有効です。Claude を使用しても有効期間は延長されません。有効期間が切れると、Claude から再度サインインするよう求められます。
{% endhint %}
{% endstep %}
{% endstepper %}
---
# Agent Instructions
This documentation is published with GitBook. GitBook is the documentation platform designed so that both humans and AI agents can read, navigate, and reason over technical content effectively. Learn more at gitbook.com.
## Querying This Documentation
If you need additional information that is not directly available in this page, you can query the documentation by asking a question.
Perform an HTTP GET request on the following URL with the `ask` and `goal` query parameters:
```
GET https://docs.flosum.com/devops/devops-ja/mcpsb/claudewodevops-mcpsbnisuru.md?ask=&goal=
```
`ask` is the immediate question: it should be specific, self-contained, and written in natural language.
`goal` is what the user is ultimately trying to achieve, the reason they need the answer. Sharing it helps GitBook give you a better, more relevant answer. A goal is most helpful when it describes the outcome the user wants rather than restating the question. For example, with `ask=how do I create an API token`, a goal like `automate deployments from our CI pipeline` lets GitBook tailor the answer to that use case.
The response will contain a direct answer to the question and relevant excerpts and sources from the documentation.
Use this mechanism when the answer is not explicitly present in the current page, you need clarification or additional context, or you want to retrieve related documentation sections.