> For the complete documentation index, see [llms.txt](https://docs.flosum.com/llms.txt). Markdown versions of documentation pages are available by appending `.md` to page URLs; this page is available as [Markdown](https://docs.flosum.com/devops/mcp-server/connecting-chatgpt-to-the-devops-mcp-server.md).
# Connecting ChatGPT to the DevOps MCP Server
{% hint style="warning" %}
#### Beta
The DevOps MCP server is in beta. Some tools may not work as expected yet, and this documentation may not reflect the latest changes to the server.
{% endhint %}
##  Overview
This article shows you how to connect ChatGPT to the DevOps MCP (Model Context Protocol) server as a custom MCP server. Once connected, ChatGPT can use the DevOps MCP tools to work with your DevOps data. You sign in with your own Flosum user during setup, so ChatGPT connects to DevOps as that user, not as the user who created the Connected App.
{% hint style="info" %}
#### Before You Start
You need a Flosum user with at least **Read access** to **DevOps**.
A SystemAdministrator must create a Connected App for MCP access. See the following article.
* [Creating a Connected App for MCP Access](https://docs.flosum.com/global-settings/security/connected-apps/creating-a-connected-app-for-mcp-access.md)
The Connected App also needs the callback URL that ChatGPT shows during setup. If it has not been added yet, a SystemAdministrator adds it in the **Add the Callback URL** step below.
{% endhint %}
## Connect ChatGPT to DevOps
{% stepper %}
{% step %}
## Start the Custom MCP Server in ChatGPT
{% hint style="info" %}
The following steps take place in ChatGPT, and some screens and settings may differ in your version of ChatGPT. If you do not see **Add custom MCP server**, your version of ChatGPT may require you to turn on **Developer mode** first. For more detailed instructions on adding a custom MCP server in ChatGPT, see the following article.
* [Add custom MCP server](https://developers.openai.com/api/docs/guides/custom-mcp-server)
{% endhint %}
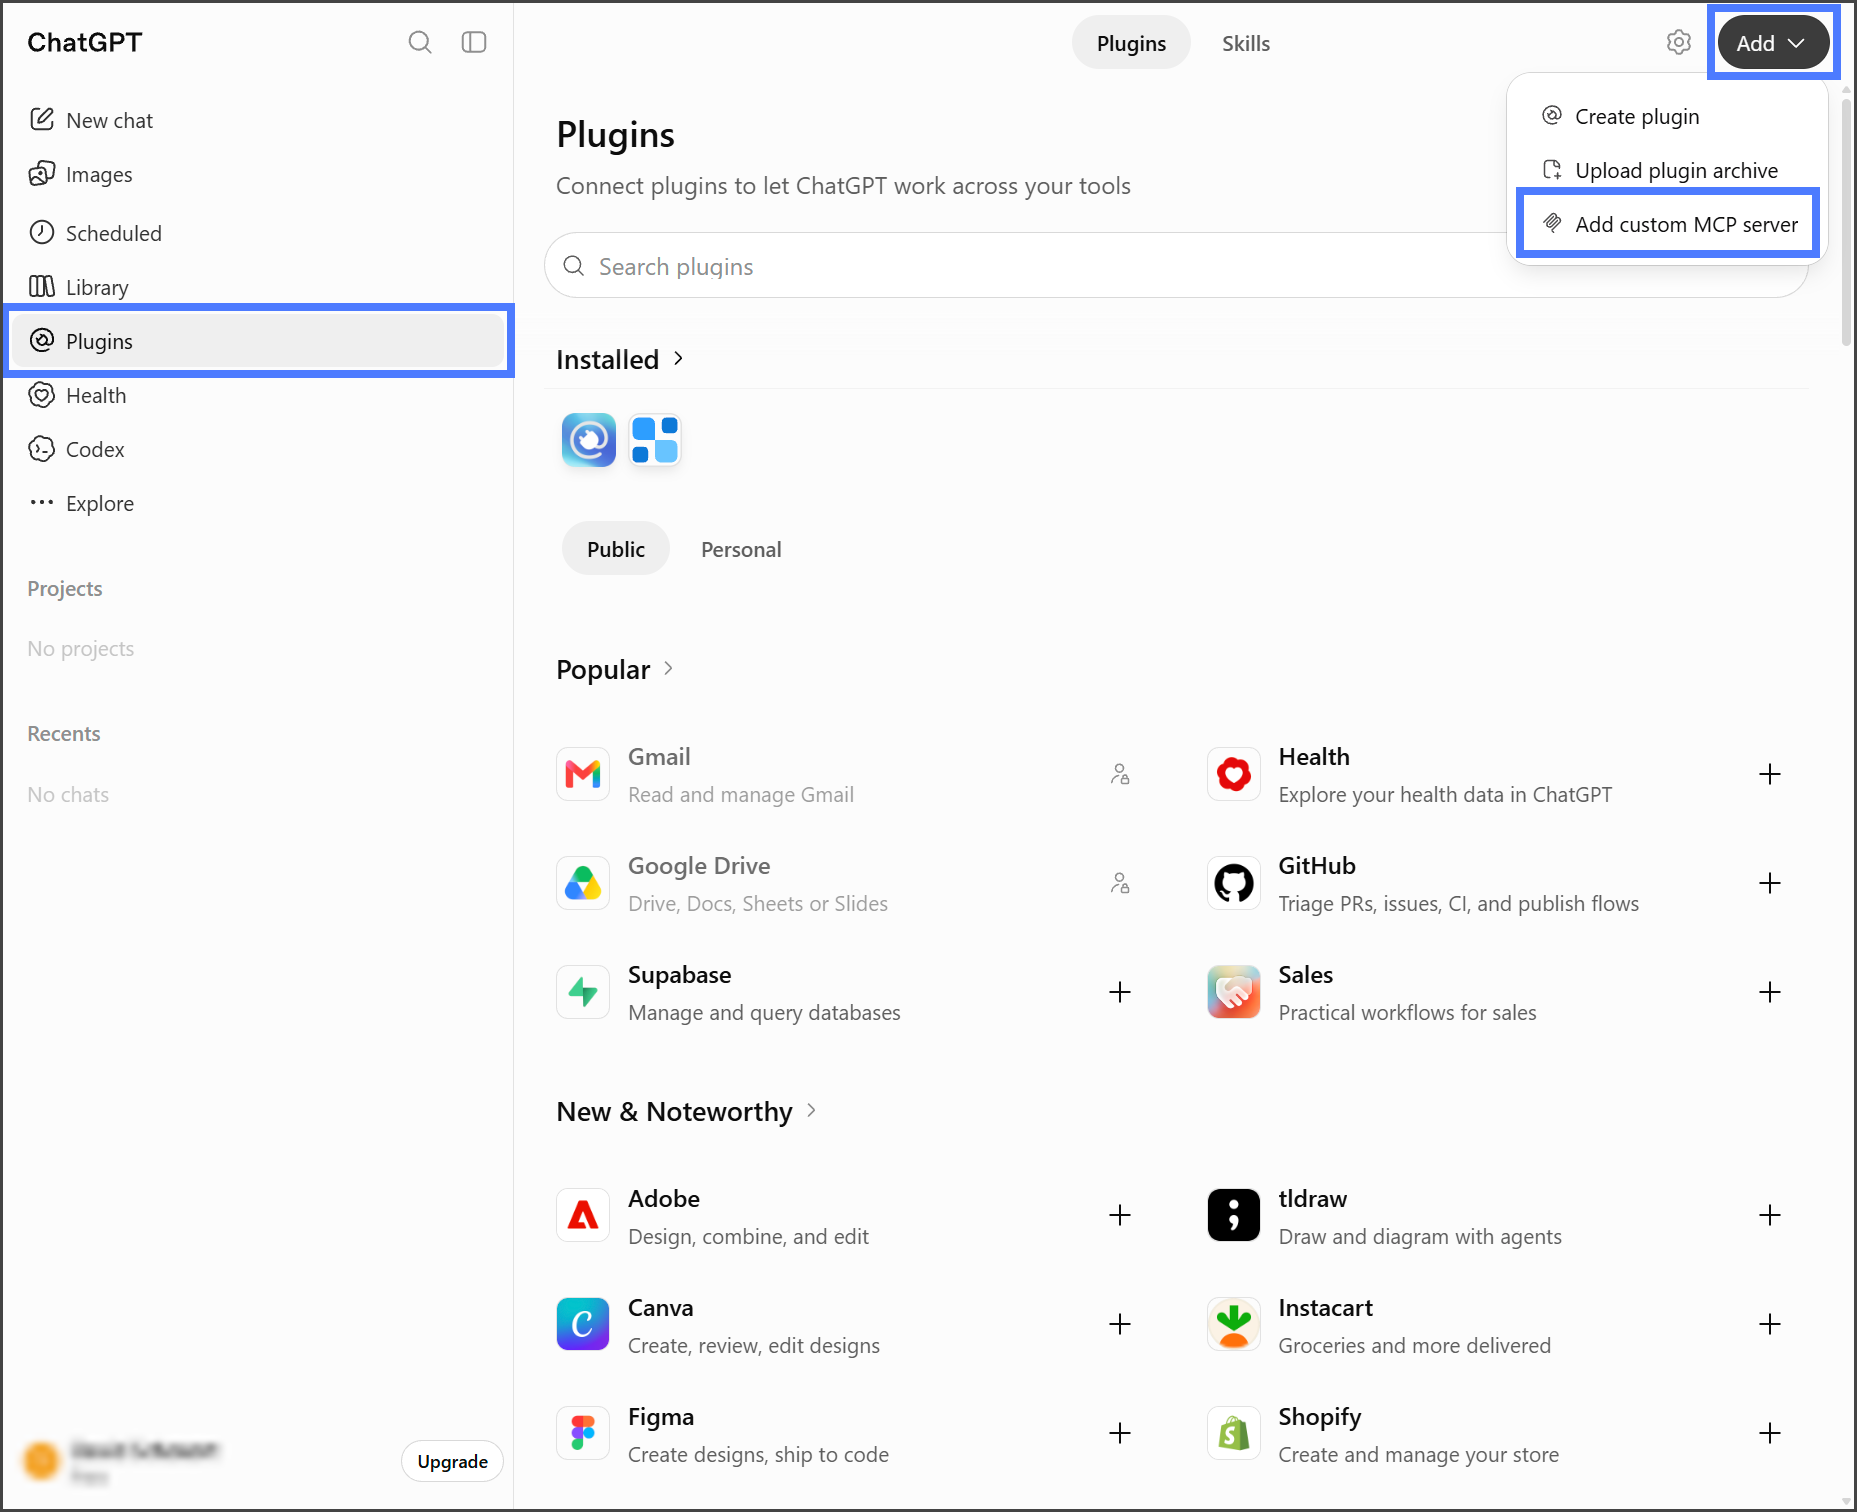
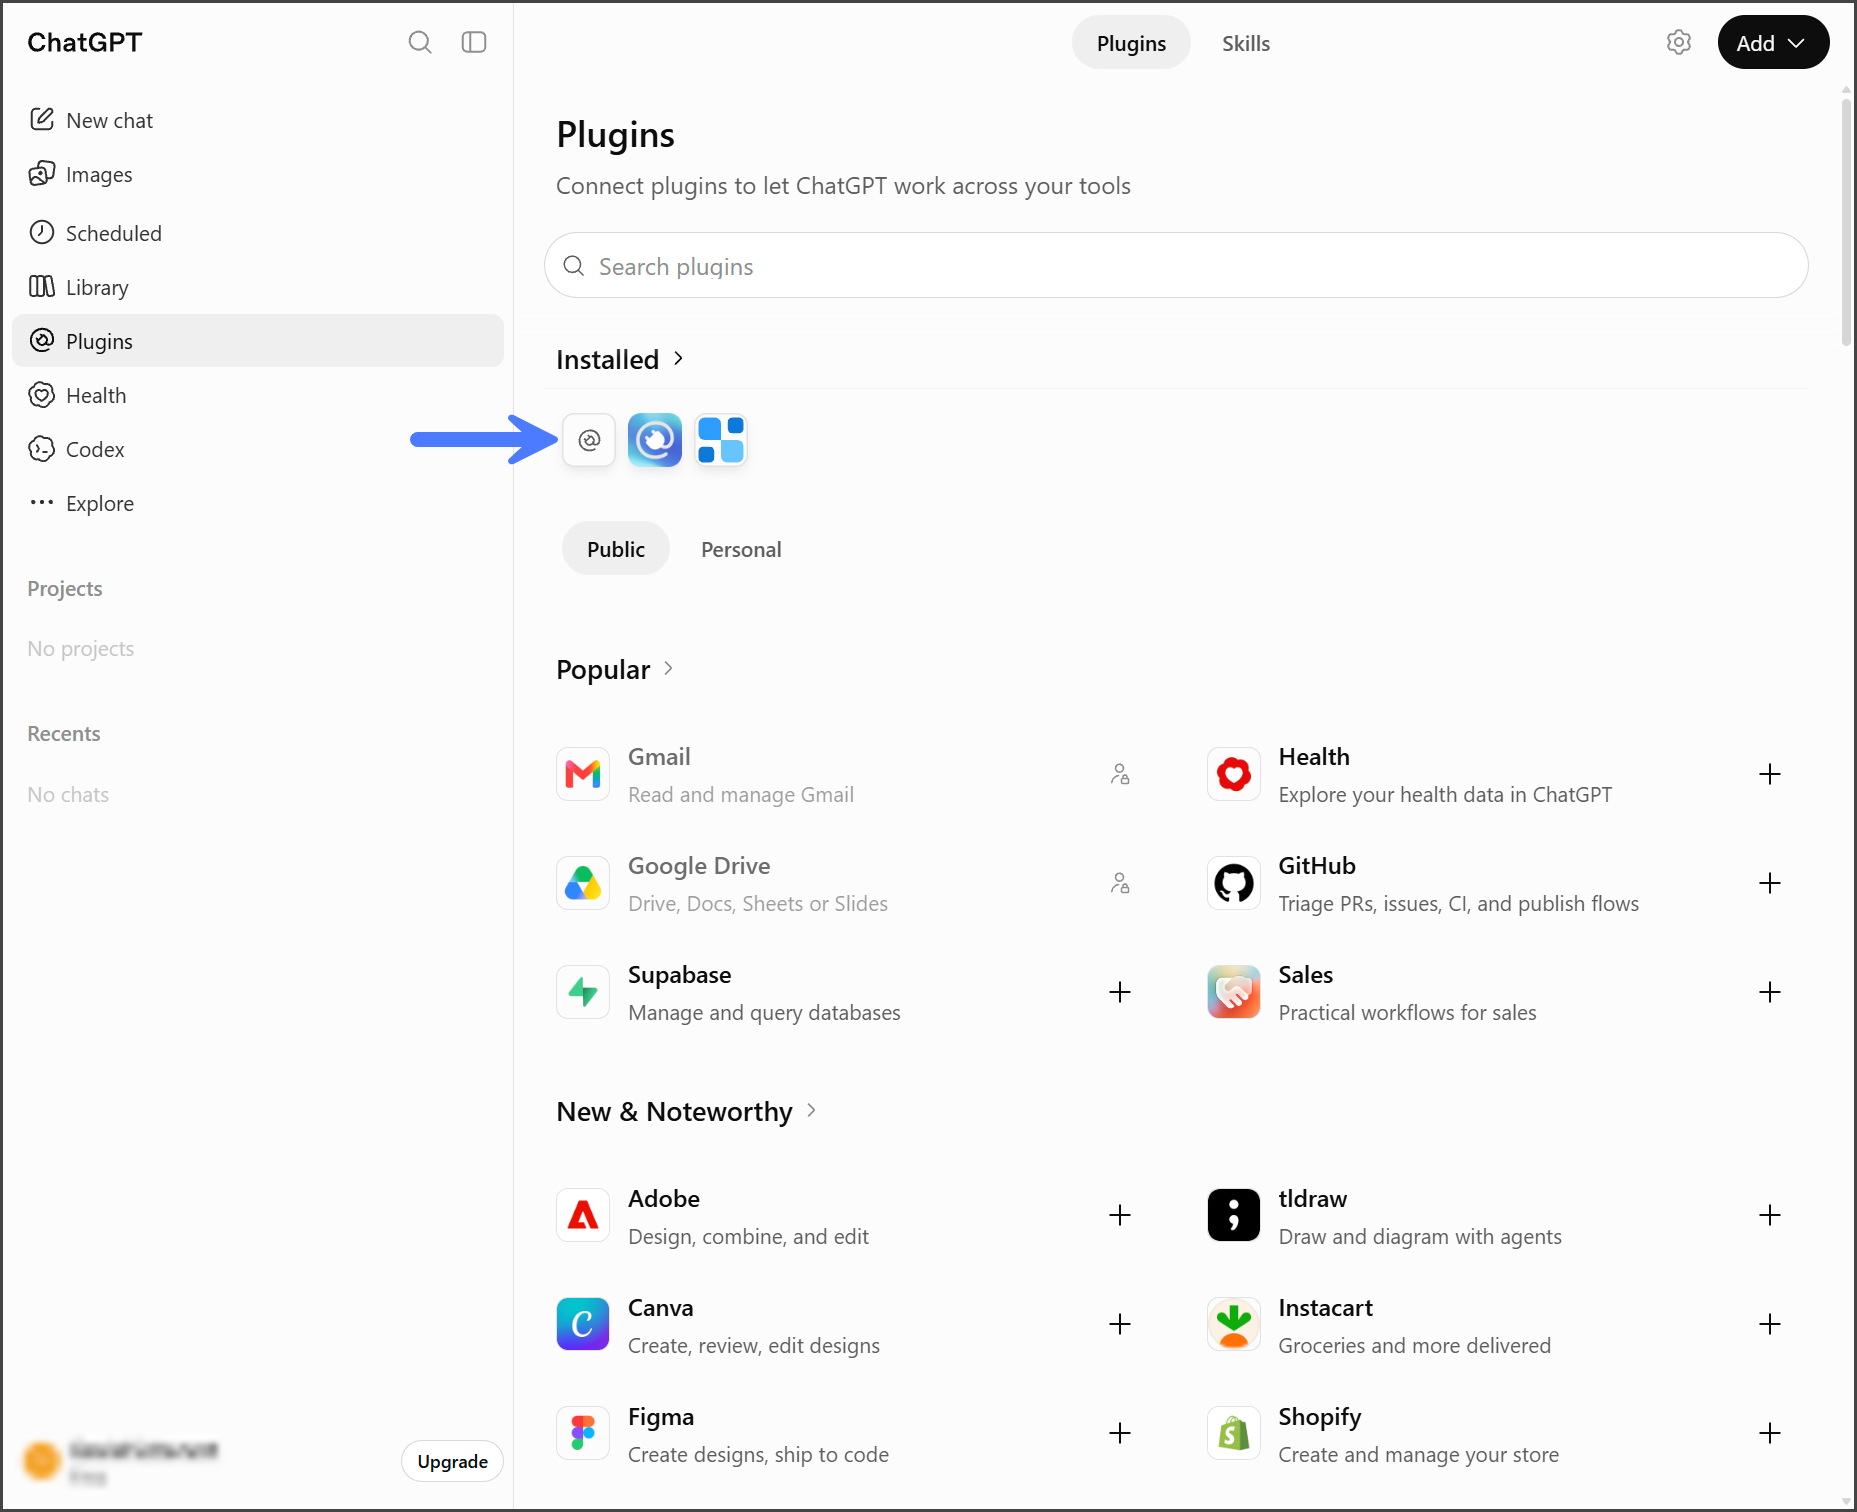
1. In ChatGPT, click **Plugins** in the left sidebar menu.
2. Click the **Add** dropdown button.
3. Click **Add custom MCP server**.
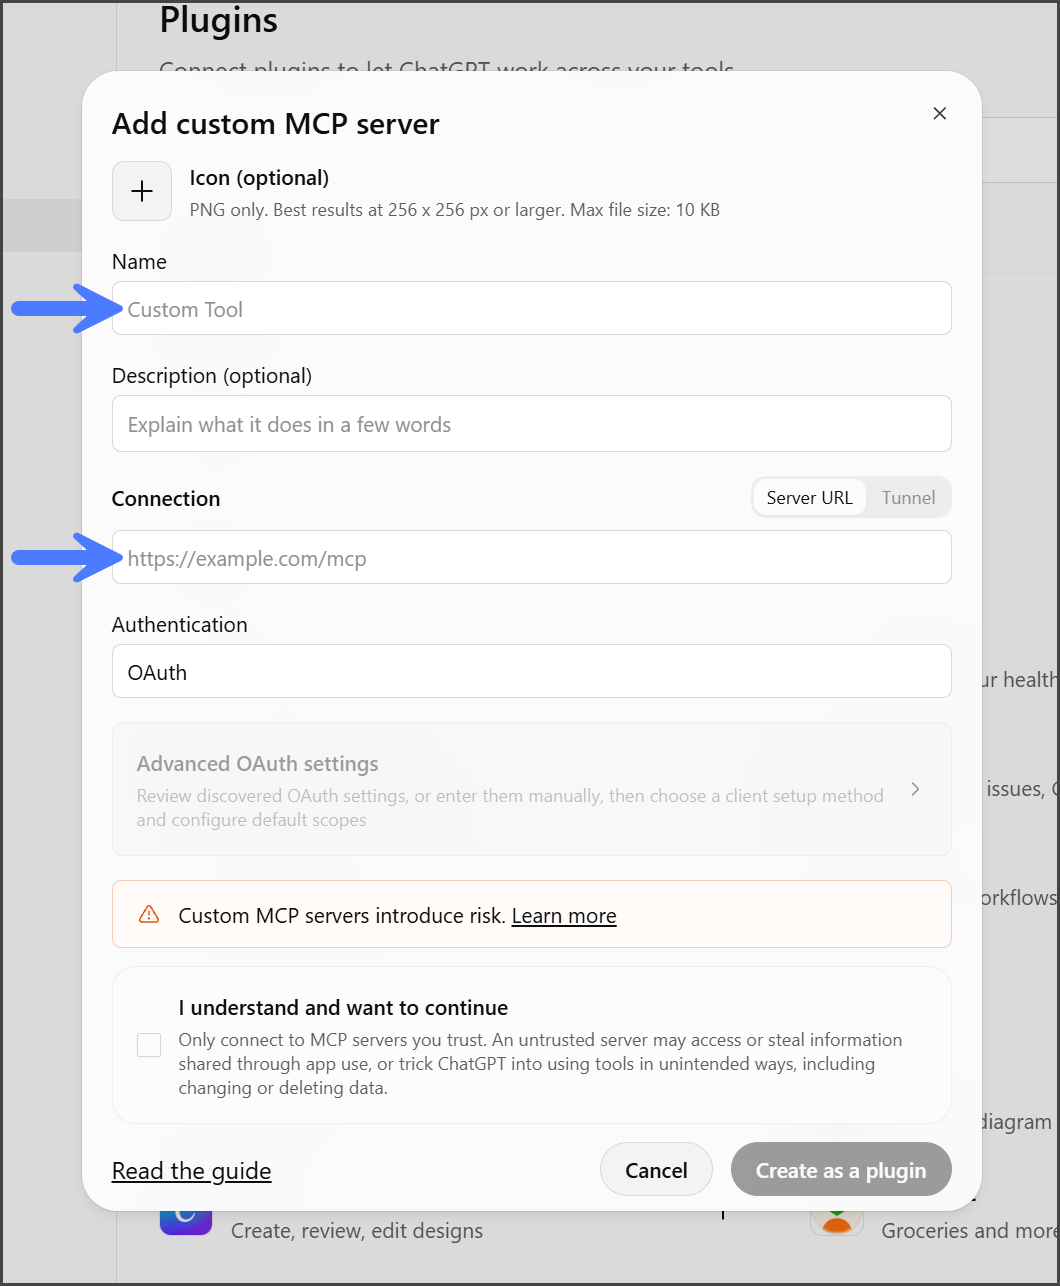
4. Enter a **Name** for the MCP server.
5. In **Connection**, enter the MCP server URL for your Flosum Cloud Apps tenant's region.
| Region | DevOps MCP Server |
|---|
| United States | space.vars.mcp_url_us |
| Germany | space.vars.mcp_url_de |
| Japan | space.vars.mcp_url_jp |
| Australia | space.vars.mcp_url_au |
6. Confirm **Authentication** is set to **OAuth**.
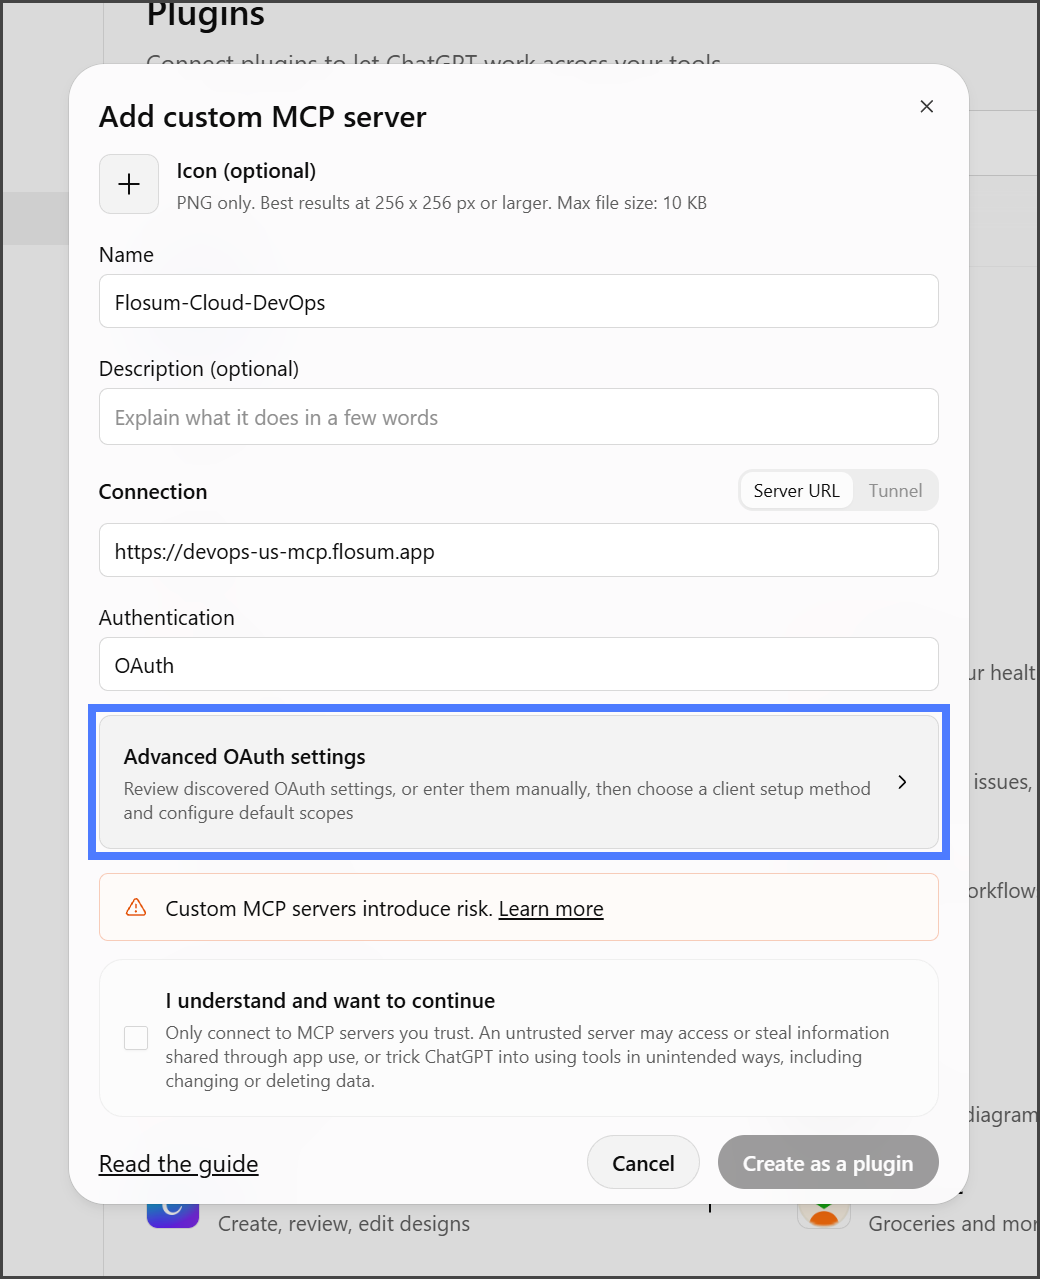
7. Click **Advanced OAuth settings**.
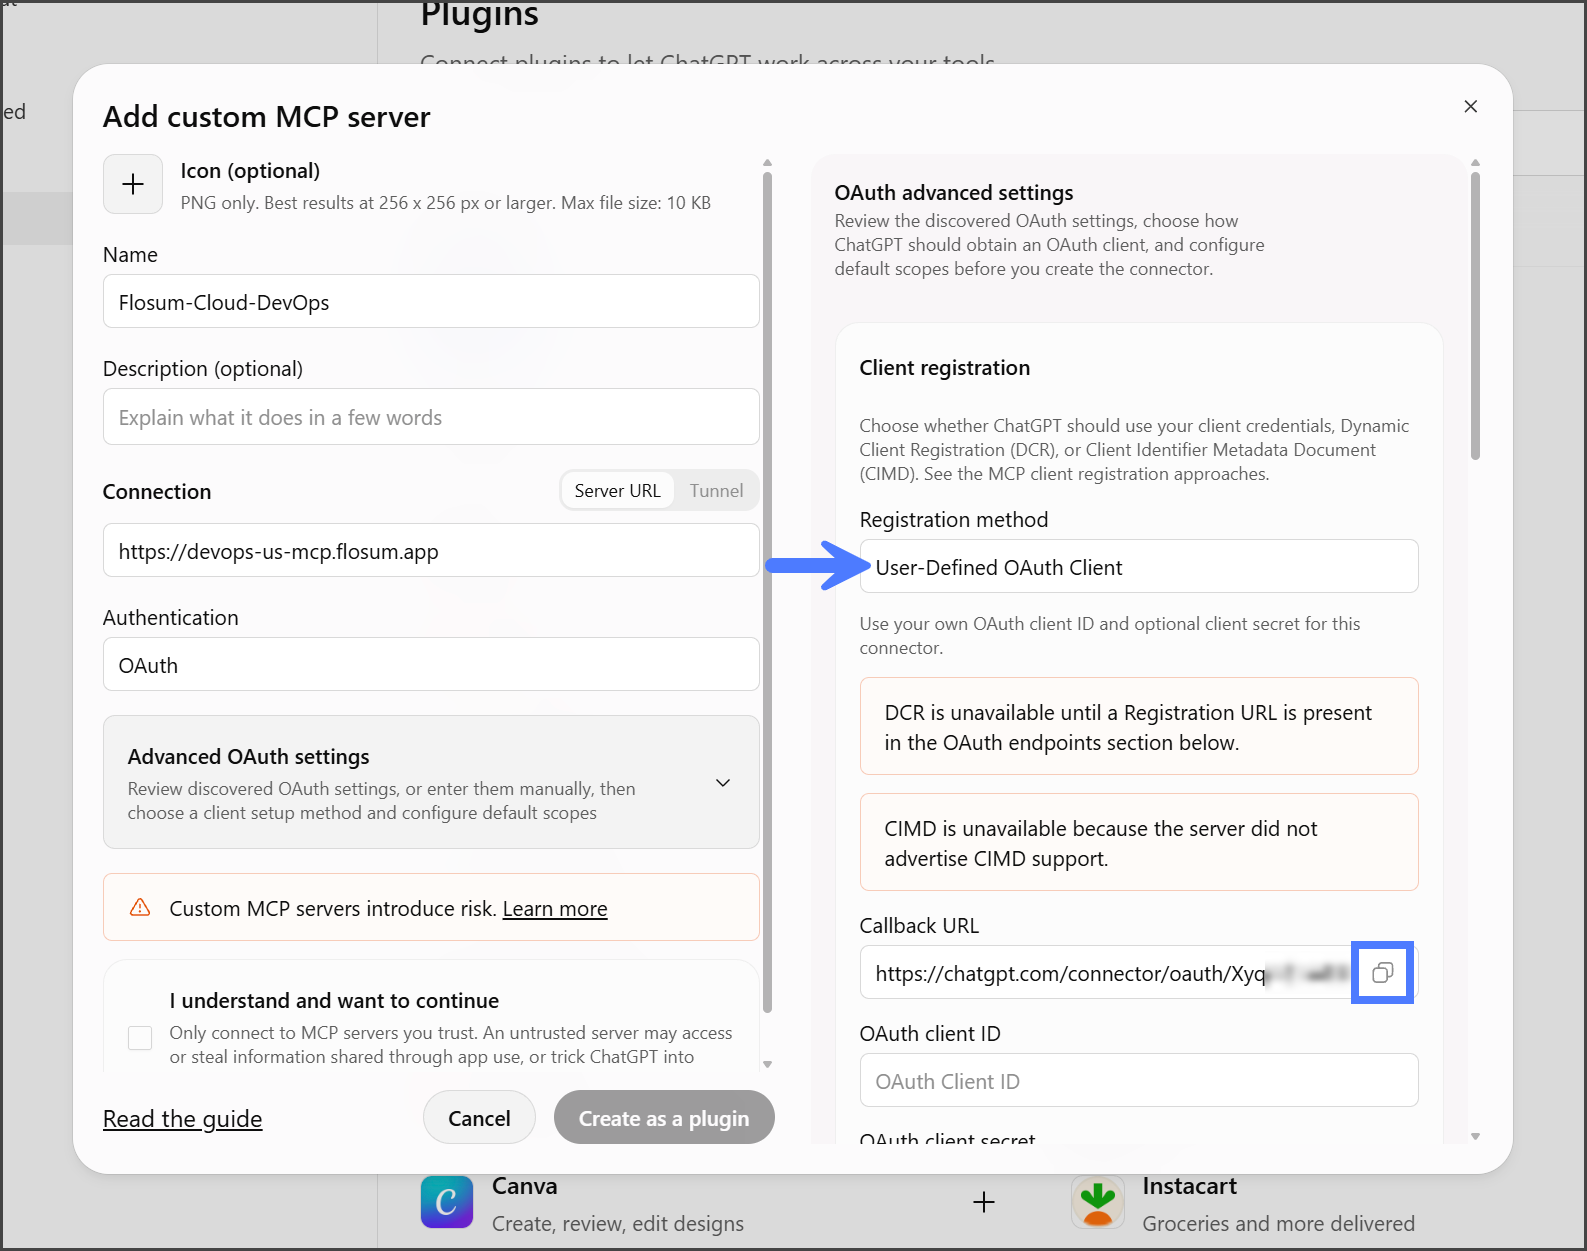
8. Set **Registration method** to **User-Defined OAuth Client**.
9. Click the copy icon beside **Callback URL** to copy the URL.
{% hint style="info" %}
#### Callback URL
A SystemAdministrator must add this callback URL to the Connected App. If you are not a SystemAdministrator, send the URL to one and ask them to add it. You can close this dialog while you wait, because ChatGPT shows the same callback URL when you start again.
Users who connect to the same MCP server usually get the same callback URL, so once it has been added, other users may be able to skip the **Add the Callback URL** step.
{% endhint %}
{% endstep %}
{% step %}
## Log In to Global Settings
Log in to Global Settings. For login instructions, see the following article.
* [Log In To Global Settings](https://docs.flosum.com/global-settings/getting-started/log-in-to-global-settings.md)
{% endstep %}
{% step %}
## Check the Callback URL
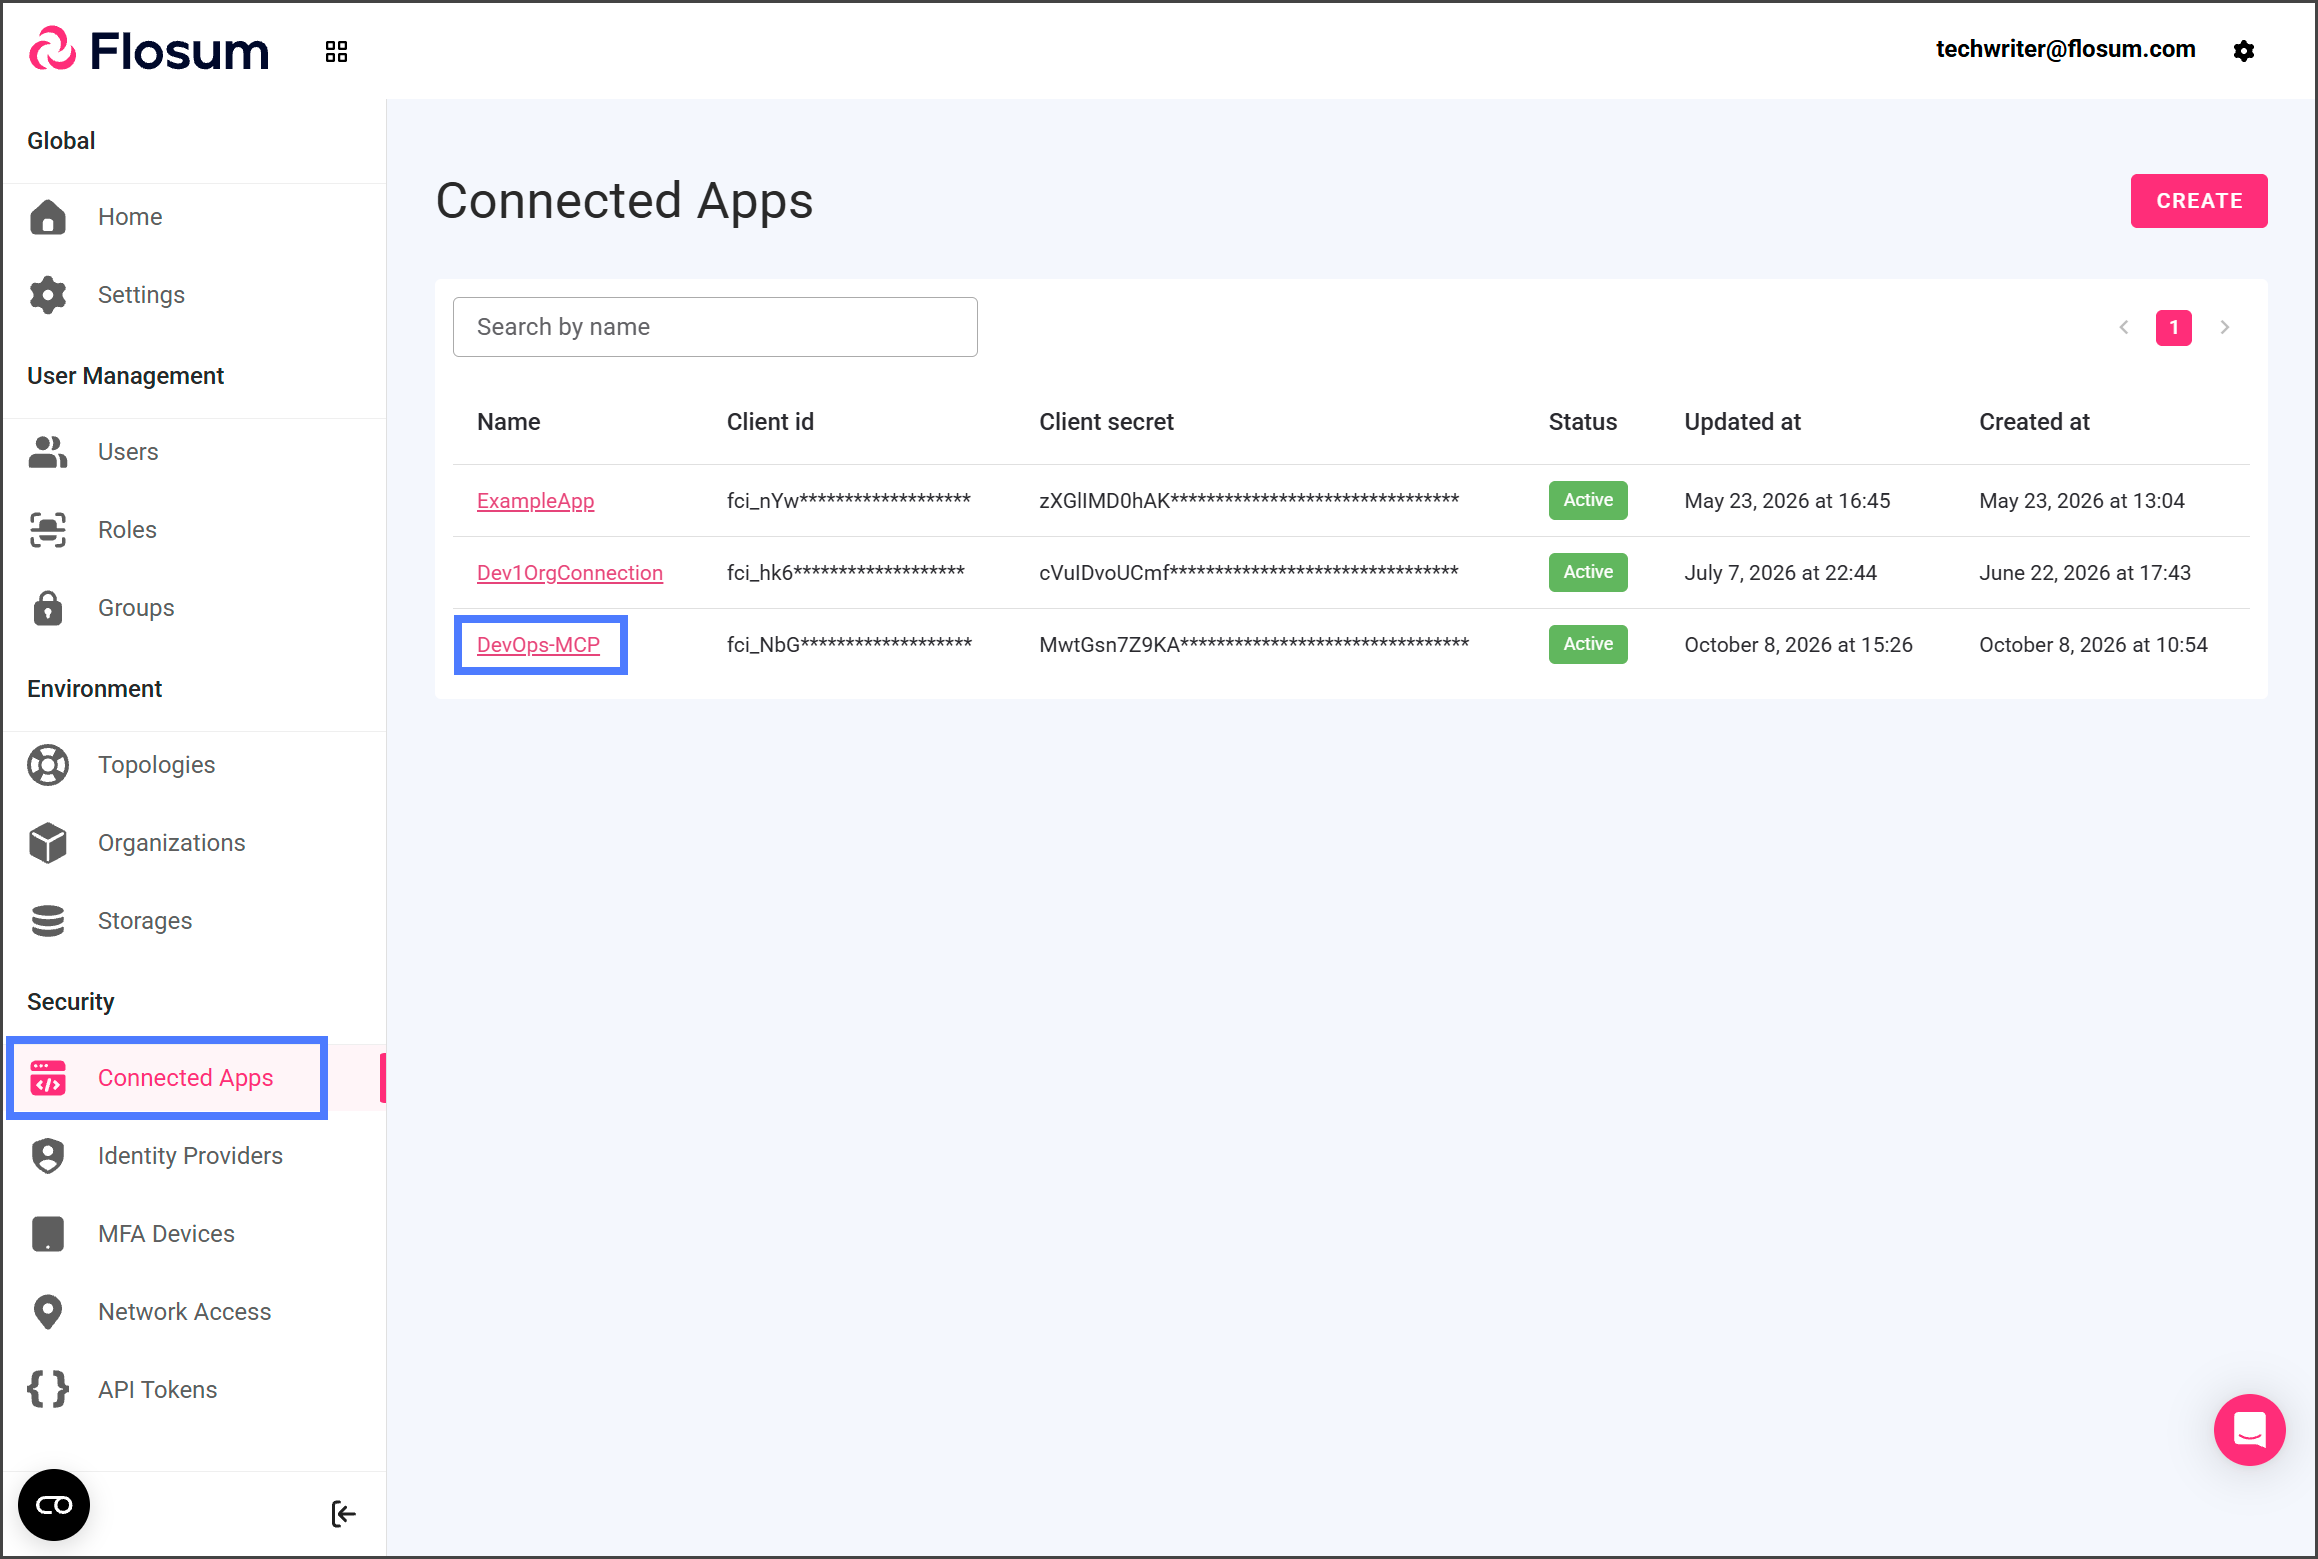
1. Click **Connected Apps** from the left sidebar menu.
2. Click the Connected App created for MCP access.
3. Under **Authorized URLs**, check that **Callback URLs** lists the callback URL you copied from ChatGPT.
{% hint style="info" %}
#### Callback URLs
If the callback URL is listed, skip to the **Copy Client ID and Client Secret** step. If it is not listed, a SystemAdministrator must add it by completing the next step.
{% endhint %}
{% endstep %}
{% step %}
## Add the Callback URL
1. Click **Edit**.
2. Click **ADD URL** under **Allowed callback URLs**.
3. Paste the callback URL you copied from ChatGPT.
4. Click **Save**.
{% endstep %}
{% step %}
## Copy Client ID and Client Secret
Any user can copy the **Client id** and **Client secret** from the Connected App.
1. Click the **Client id** field to copy this value.
2. Save the copied value.
3. Click the **Client secret** field to copy this value.
4. Save the copied value.
{% endstep %}
{% step %}
## Finish the Custom MCP Server in ChatGPT
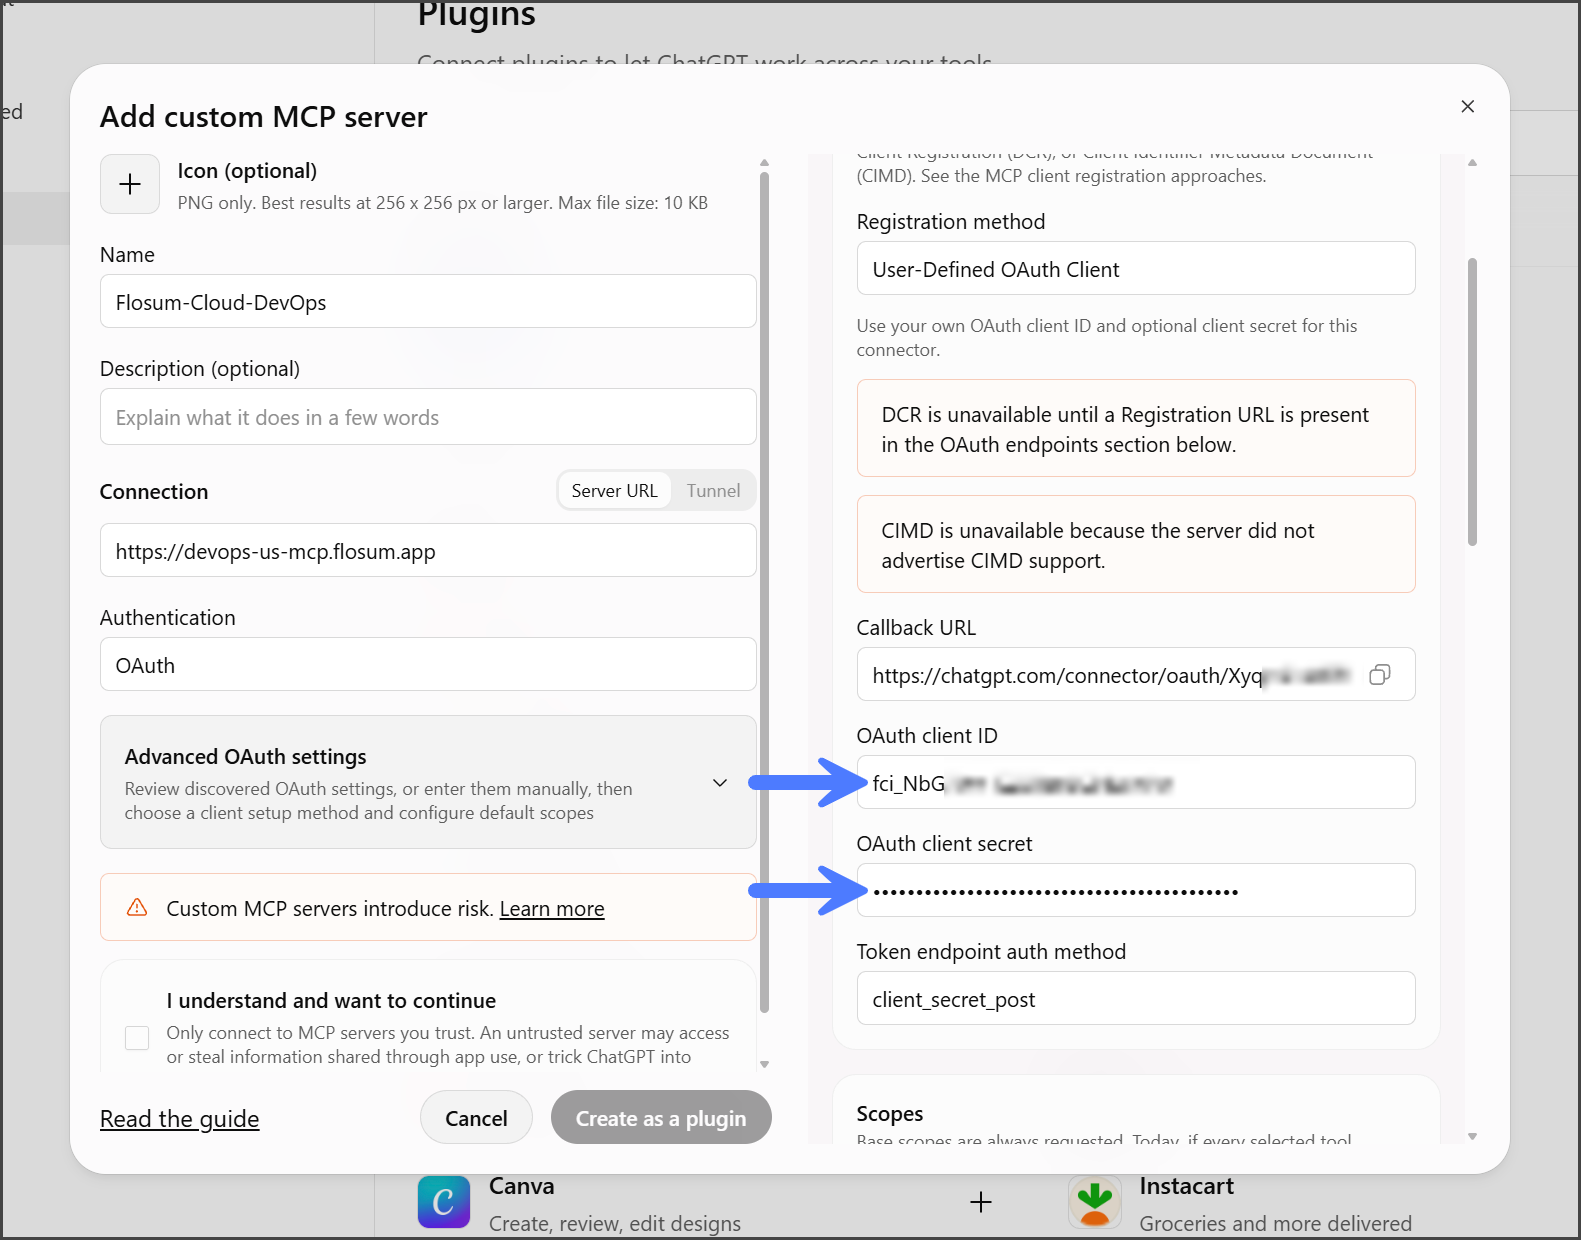
1. Return to the **Add custom MCP server** dialog in ChatGPT.
2. Enter the **Client id** you copied from the Connected App in **OAuth client ID**.
3. Enter the **Client secret** you copied from the Connected App in **OAuth client secret**.
4. Leave **Token endpoint auth method** set to **client\_secret\_post**, which ChatGPT selects after you enter the client secret.
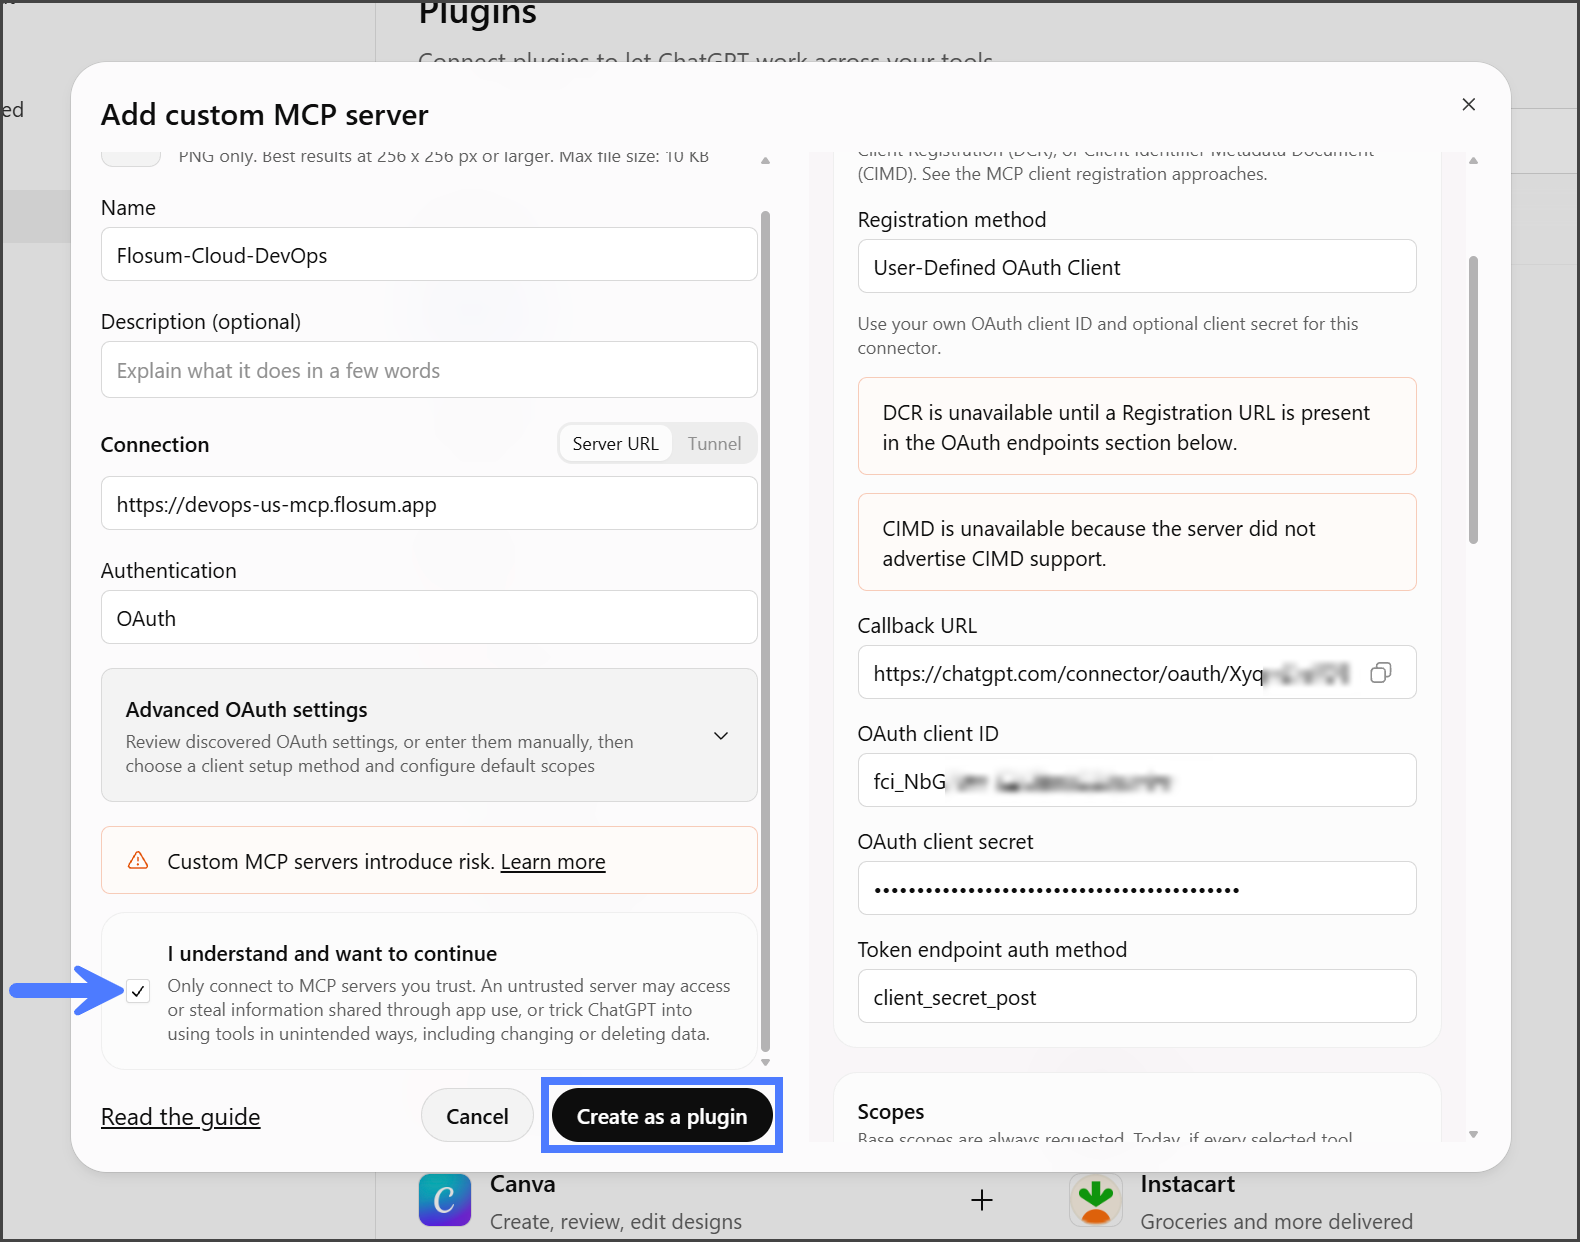
5. Check **I understand and want to continue**.
6. Click **Create as a plugin**.
{% endstep %}
{% step %}
## Sign In to Flosum
{% hint style="warning" %}
If you are logged in to Flosum Cloud Apps in the same browser, ChatGPT connects with that Flosum user and does not show the sign-in page. To connect with a different user, log out of Flosum Cloud Apps before you continue. If ChatGPT already connected with the wrong user, log out of Flosum Cloud Apps, open the plugin's settings in ChatGPT, and click **Reconnect** in the connected account's menu to sign in again.
{% endhint %}
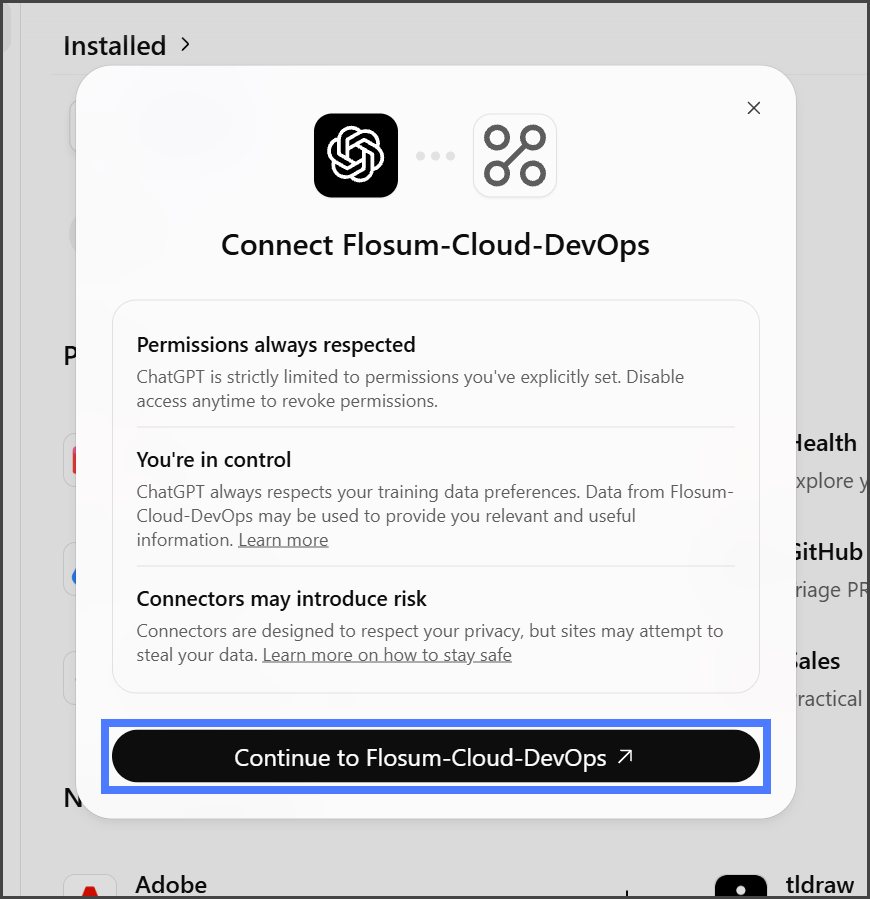
1. Click **Continue to** followed by the name of your MCP server.
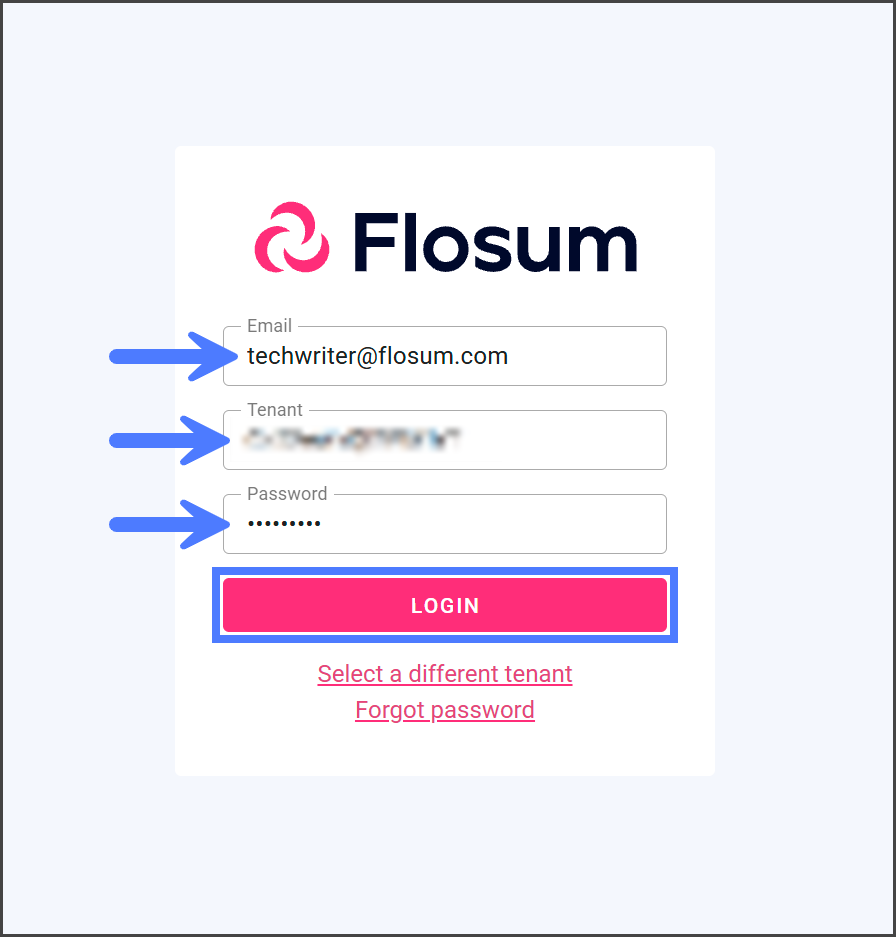
2. Enter your Flosum **Email**.
3. Enter your **Tenant**.
4. Enter your **Password**.
5. Click **LOGIN**.
{% endstep %}
{% step %}
## Confirm the Connection
After you sign in, ChatGPT returns to **Plugins**, and the new plugin appears under **Installed**.
{% hint style="success" %}
The DevOps MCP server is now connected. Start a new chat in ChatGPT to use the DevOps MCP tools.
{% endhint %}
{% hint style="info" %}
Your connection lasts as long as the Connected App's **Refresh token lifetime**, counted from when you sign in. Using ChatGPT doesn't extend it. When it runs out, ChatGPT asks you to sign in again.
{% endhint %}
{% endstep %}
{% endstepper %}
---
# Agent Instructions
This documentation is published with GitBook. GitBook is the documentation platform designed so that both humans and AI agents can read, navigate, and reason over technical content effectively. Learn more at gitbook.com.
## Querying This Documentation
If you need additional information that is not directly available in this page, you can query the documentation by asking a question.
Perform an HTTP GET request on the following URL with the `ask` and `goal` query parameters:
```
GET https://docs.flosum.com/devops/mcp-server/connecting-chatgpt-to-the-devops-mcp-server.md?ask=&goal=
```
`ask` is the immediate question: it should be specific, self-contained, and written in natural language.
`goal` is what the user is ultimately trying to achieve, the reason they need the answer. Sharing it helps GitBook give you a better, more relevant answer. A goal is most helpful when it describes the outcome the user wants rather than restating the question. For example, with `ask=how do I create an API token`, a goal like `automate deployments from our CI pipeline` lets GitBook tailor the answer to that use case.
The response will contain a direct answer to the question and relevant excerpts and sources from the documentation.
Use this mechanism when the answer is not explicitly present in the current page, you need clarification or additional context, or you want to retrieve related documentation sections.